Welcome to the Easy MTD help.
Contents
Below are the main sections found in this help. The content of each section is summarised at the beginning of the section.
- Introduction
- Getting Started
- Using Easy MTD as an Agent
- Connecting Easy MTD with HMRC
- Income Tax
- Value Added Tax
- Dealing with Figures
- Troubleshooting
Introduction
Easy MTD is HMRC-recognised bridging software for individuals, businesses and agents who need to comply with Making Tax Digital (MTD) for Income Tax and Making Tax Digital (MTD) for VAT. It is a complete rebuild and a replacement for the successful Easy MTD VAT that has provided businesses and agents with the ability to submit VAT returns under MTD since April 2019.
With the launch of MTD for Income Tax in April 2026, the decision was made to produce a single application to conveniently serve both Income Tax and VAT. With a new interface, and many new features compared to its predecessor, Easy MTD is one of the leading MTD bridging solutions.
Getting Started
The Getting Started section describes the fundamentals of getting Easy MTD downloaded, installed and configured, ready for managing and filing Income Tax and VAT.
The following information appears in this section:
- Prerequisites
- System Requirements
- Downloading
- Installing
- Uninstalling
- Launching
- Importing Easy MTD VAT Businesses and Agents
- Interface Overview
- Using the Menu
- Welcome Section
- Specifying an Account
- Updating
- Specifying Proxy Settings
- Data Folder and Data Files
- Preferences
- Viewing the Version
- Support
- Exiting
Prerequisites
Before Easy MTD is used, the following should be considered:
Read the Agent Guidance
For agent related information, refer to the Agents section below.
Sign Up for an Easy MTD Account
Easy MTD cannot be used to submit a quarterly update, final declaration or VAT return until an Easy MTD account has been specified. Prior to this, sign up for an account in any of the following ways:
- Specify the following URL in a browser:
easymtd.com/account/sign-up - Click the Sign Up button in the Account window.
Note: When signing up for an Easy MTD account on the Easy MTD website, a token is automatically added to the account. This allows the first quarterly update or VAT return to be submitted for free.
Buy Tokens
Before Easy MTD can be used to submit a quarterly update, final declaration and VAT return, a token must be available in the Easy MTD account specified in Easy MTD. Tokens can be purchased and added to an account in any of the following ways:
- Specify the following URL in a browser:
easymtd.com/buy-tokens - Click the Buy Tokens option on the Options menu.
- Click the Buy Tokens link in the Welcome section.
- Click the Buy Tokens link in the Options section.
- Click the Buy Now button in the Token Unavailable window.
System Requirements
Easy MTD has the following system requirements:
- Windows 10, 11 (32/64 bit)*
- United Kingdom (£) currency format set for Windows
- Internet connection
*Note: Easy MTD can be used with Windows 7, 8 and 8.1 but is unsupported and no fixes will be issued if Easy MTD fails to function correctly under one of these operating systems. These operating systems are no longer supported by Microsoft, and we advise updating to the latest version of Windows.
Downloading
To download Easy MTD, specify the following URL in a browser:
Installing
After downloading Easy MTD, install it by opening the Easy_MTD_n_Setup.exe file. Either click the downloaded file link in the browser it was downloaded in, or locate and double-click the file in the Downloads folder which is accessed using Windows File Explorer (see figure below).
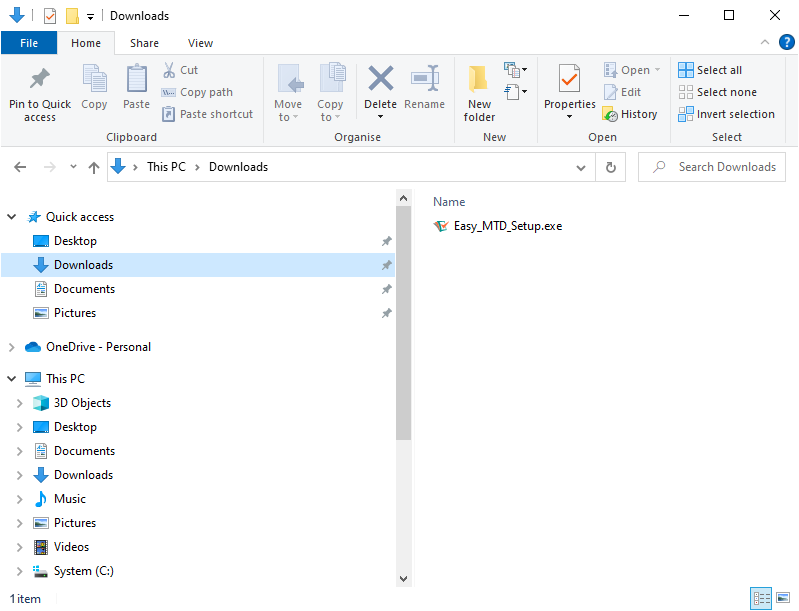
Fig. Windows File Explorer showing the Downloads folder
The installation process is straightforward, and guidance is provided for each step.
Note: To ensure the setup has not been tampered with and is created and published by Fly Software, "Fly Software Ltd" appears as the Verified Publisher in the Windows User Account Control window that is opened at the start of the installation process.
Default Folders
Easy MTD program files are stored by default in the following folder:
- C:\Program Files (x86)\Easy MTD
The Easy MTD App.ini configuration file is stored by default in the following folder:
- C:\ProgramData\Easy MTD
More: For details about the folder where data files are stored, refer to Getting Started > Data Folder and Data Files.
Uninstalling
Easy MTD is uninstalled using the Add or Remove Programs feature in Windows. Refer to the Windows documentation or help for further instruction about uninstalling programs.
Launching
Easy MTD is launched by opening the Easy MTD shortcut which is found on the Windows Start menu and desktop (if the option to create this was selected during installation).
![]()
Fig. Easy MTD shortcut icon
Immediately after launch, some of the following windows may be opened:
Connection Error
When Easy MTD in unable to connect to the Internet, a Connection Error window (see figure below) is opened after Easy MTD is launched.

Fig. Connection Error window
If a proxy is being used, associated settings must be specified so a connection to the Internet can be made. Therefore, click the Proxy button.
More: For further details about specifying proxy settings, refer to Getting Started > Proxy Settings.
If a proxy is not used, there is an issue with the Internet connection. Refer to the following knowledge base article for ways to resolve this:
Update Available
When an Easy MTD update is available, an Update Available window (see figure below) is opened after Easy MTD is launched.
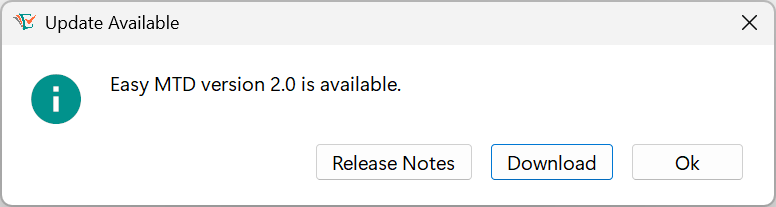
Fig. Update Available window
To automatically download the update, click the Download button to open the Easy MTD "Download" page in the default browser.
To view the release notes for the update, click the Release Notes button to open the Easy MTD "Release Notes" page in the default browser.
To close the Update Available window and continue using Easy MTD without updating, click the OK button.
More: For further details about updating, refer to Getting Started > Updating.
Critical Update Required
When an Easy MTD critical update is required, a Critical Update Required window is opened after Easy MTD is launched. Until Easy MTD is updated, the Critical Update Required window continues to be opened after launch and Easy MTD cannot be used.

Fig. Critical Update Required window
To download the update, click the Download button to open the Easy MTD "Download" page in the default browser.
To view the release notes for the update, click the Release Notes button to open the Easy MTD "Release Notes" page in the default browser.
To close the Critical Update Required window and exit Easy MTD, click the Exit button.
More: For further details about updating, refer to Getting Started > Updating.
Locked Data
If Easy MTD data is locked, the Locked Data window (see figure below) is opened after Easy MTD is launched. Until the lock is removed, the Locked Data window continues to be opened after launch and Easy MTD cannot be used.

Fig. Locked Data window
To close the Locked Data window and exit Easy MTD, click the Exit button. Wait for the instance of Easy MTD that caused the lock to be exited (and stop using the data files) before launching Easy MTD again.
More: For further details about locking data, refer to Getting Started > Data Folder and Data Files > Locking Data.
Importing Easy MTD VAT Businesses and Agents
If Easy MTD VAT is installed on the same computer as Easy MTD, businesses and agents specified in Easy MTD VAT are automatically imported into Easy MTD. This occurs when Easy MTD is first launched after installation.
Due to Easy MTD being viewed by HMRC as a different software product to Easy MTD VAT (despite both being developed and published by Fly Software), the connection for each business and/or agent (referred to as authority in Easy MTD VAT) is not retained in Easy MTD. This means a connection with HMRC must be made for each business and/or agent in Easy MTD.
Importing When Easy MTD VAT is on a Different Computer
If Easy MTD VAT is installed on a different computer to where Easy MTD is installed, and businesses and agents specified in Easy MTD VAT need to be imported into Easy MTD, perform the following actions:
- Install Easy MTD VAT on the same computer as Easy MTD.
- Ensure Easy MTD VAT and Easy MTD are exited on all computers.
- Copy the Easy MTD VAT data on the other computer to the computer where Easy MTD VAT has just been installed. Refer to the following Knowledge Base article for instructions about how to do this:
easymtd.com/support/knowledge-base-article?id=83 - Launch Easy MTD so businesses and agents are imported from Easy MTD VAT.
Alternatively, add businesses and add agents to Easy MTD instead of importing them.
Interface Overview
The following screenshot (see figure below) and table describe the components of the Easy MTD main interface.

Fig. Easy MTD main interface
| Label | Name | Description |
|---|---|---|
| A | Title Bar | Identifies the software and provides buttons to minimise, maximise and close (exit) Easy MTD. |
| B | Account Details | Shows the email of the Easy MTD account applied to Easy MTD and the number of tokens in that account. |
| C | Menu | Provides options for viewing sections, viewing pages, opening windows and opening URLs in the default browser. |
| D | Page | Shows information relating to the selected menu or menu option. |
| E | Version and Copyright | Displays the Easy MTD version and the copyright notice. |
Using the Menu
The menu (see figure below) located to the left of the Easy MTD interface provides access to the core functionality of Easy MTD. It consists of five menu items, four of which have associated options.
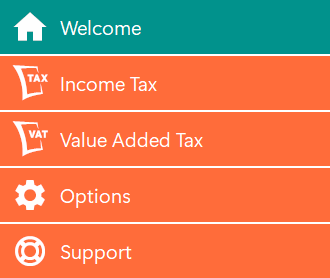
Fig. Menu
The following menu items and associated options appear on the menu:
| Menu Item | Options | Description |
|---|---|---|
| Welcome | None | Opens the Welcome section where panels are presented to access the core functionality of Easy MTD. |
| Income Tax | Obligations, Business Figures, Individual Figures, Calculation, Account Information, Taxpayers, Service Availability | Shows the associated menu options and opens the Income Tax section where panels are presented to access all the Income Tax functionality of Easy MTD. |
| Value Added Tax | Obligations, Businesses, Account Information, Service Availability | Shows the associated menu options and opens the Value Added Tax section where panels are presented to access all the VAT functionality of Easy MTD. |
| Options | Agents, Account, Data Folder, Backup, Proxy, Update, Buy Tokens, Preferences | Shows the associated menu options and opens the Options section where panels are presented to access all the additional functionality of Easy MTD. |
| Support | Help, Guides, Knowledge Base | Shows the associated menu options and opens the Support section where panels are presented to access all the support functionality of Easy MTD including HMRC services and guidance URLs. |
Click a menu item to show associated options (if available) and open the associated section in Easy MTD.
Click a menu option to open the associated page in Easy MTD.
The Welcome Section
The Welcome section (see figure below) provides access to almost all the functionality in Easy MTD from one convenient location. It is accessed by clicking the Welcome item on the menu.
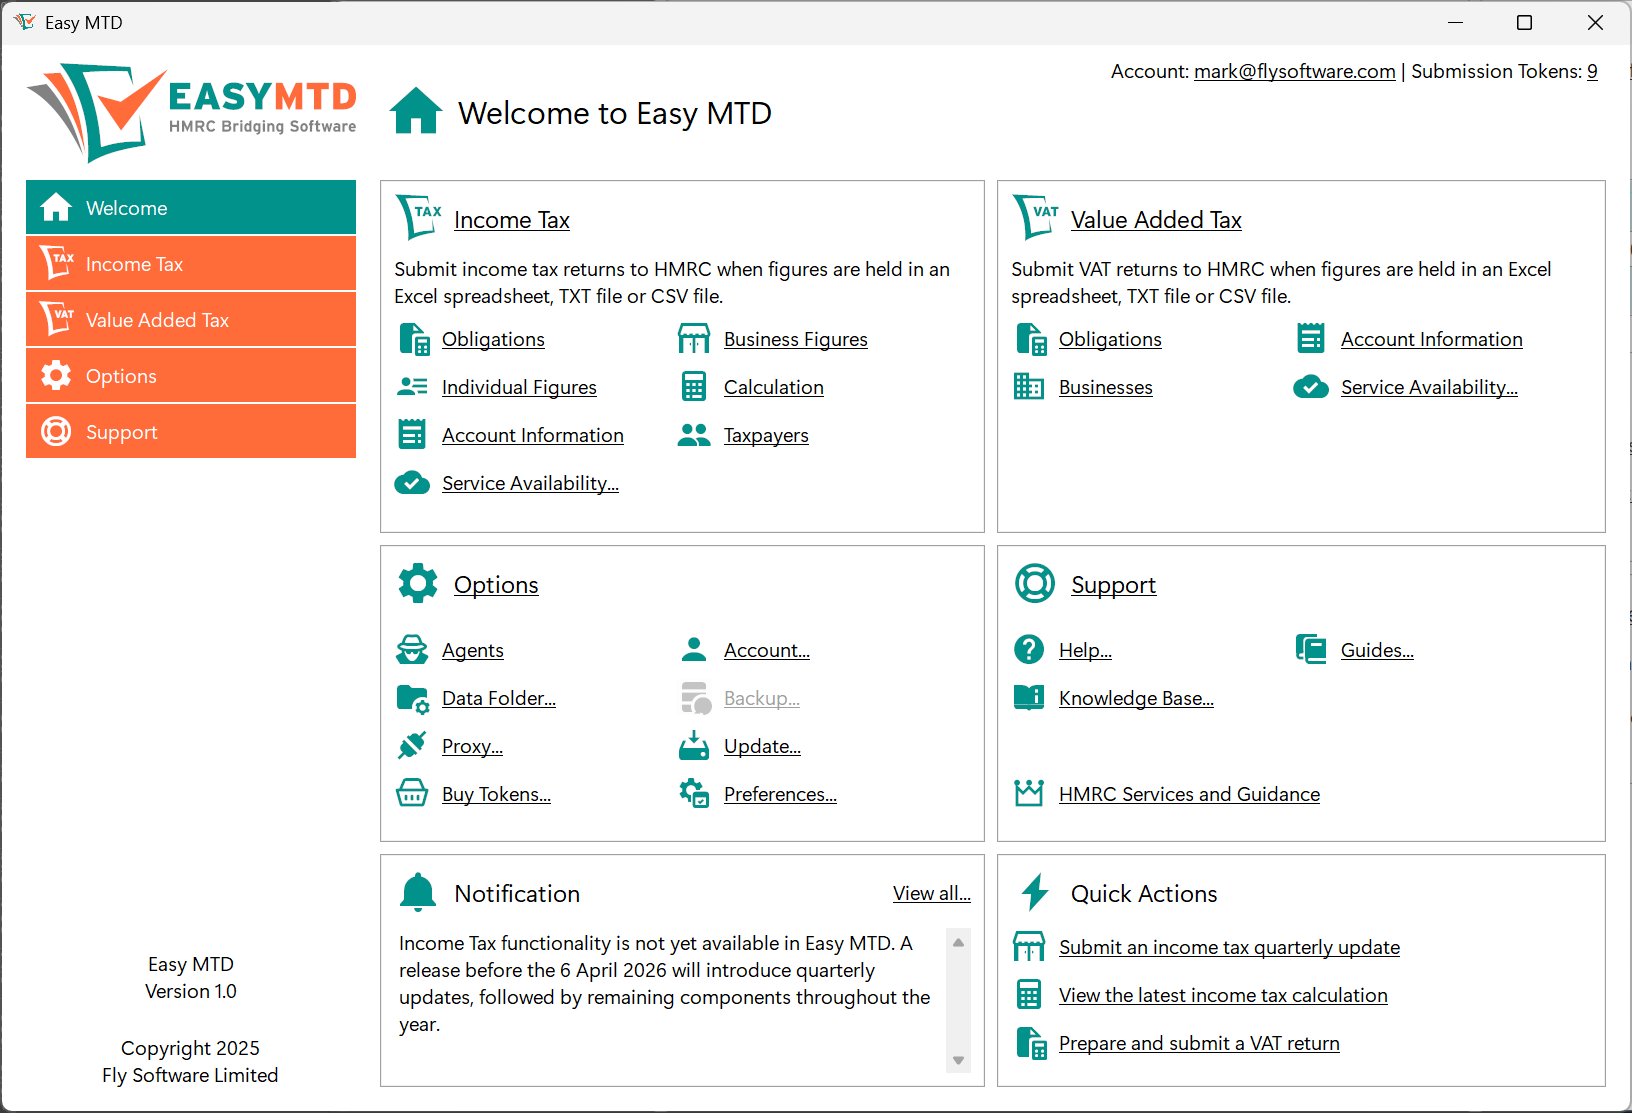
Fig. Welcome section
Panels appear for the Income Tax, Value Added Tax, Options and Support sections. These contain links to pages and components associated with these sections. In addition, a Notifications panel is present that shows the latest notification, and a Quick Actions panel that provides links to perform common tasks.
Specifying an Account
To submit a quarterly update, final declaration and VAT return, an Easy MTD account email and password must be specified in Easy MTD.
Click the Account option on the Settings menu or the Account link in the Welcome section or the Options section to open the Account window (see figure below).
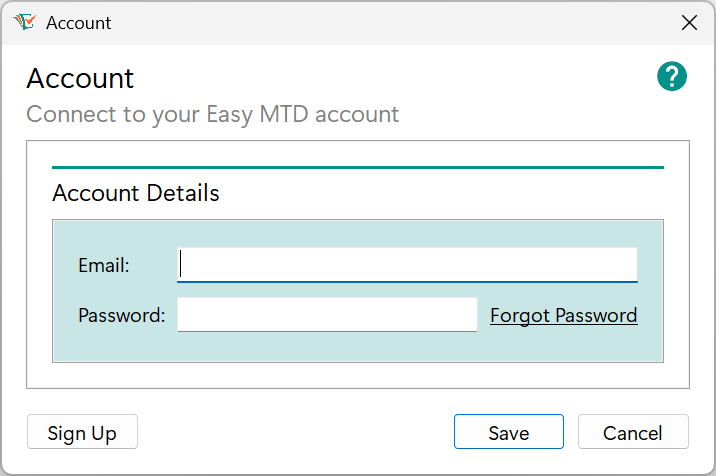
Fig. Account window
Specify an account email and password, and click the Save button. If the email and password are valid they are saved and the Account window is closed.
If the email and/or password is invalid, a Warning window is opened indicating this. Click the OK button to close the Warning window and specify the correct email and/or password.
Note: The Account window is also opened when attempting to submit a quarterly update, final declaration or VAT return if an account email and password have not been specified.
Resetting Your Password
When an account password is forgotten it can be reset. Click the Forgot Password link in the Account window or specify the following URL in a browser:
Updating
Easy MTD is occasionally updated to conform with HMRC Making Tax Digital requirements, to improve functionality and to fix issues. When an update is available, the Update Available window (see figure above) or the Critical Update Required window (see figure above) is opened when Easy MTD is launched.
Access to an update can be gained from these windows or by clicking the Update option on the Options menu or the Update link in the Welcome section or Options section. Following this, and if an update is available, the Update Available window is opened (see figure above).
More: For further details about updating, refer to Getting Started > Launching > Update Available.
More: For further details about critical updates, refer to Getting Started > Launching > Critical Update Required.
Specifying Proxy Settings
If the computer that Easy MTD is installed on uses a proxy to connect to the Internet, proxy settings must be specified before Easy MTD can be used.
When Easy MTD is first launched on a computer where a proxy is used, a Connection Error window is opened. This is because Easy MTD cannot connect to the Internet because proxy settings have not yet been specified.
More: For further details about the connection error, refer to Getting Started > Launching > Connection Error.
To specify proxy settings, click the Proxy button in the Connection Error window, the Proxy option on the Options menu or the Proxy link in the Welcome section or the Options section. Following this, the Proxy window (see figure below) is opened.
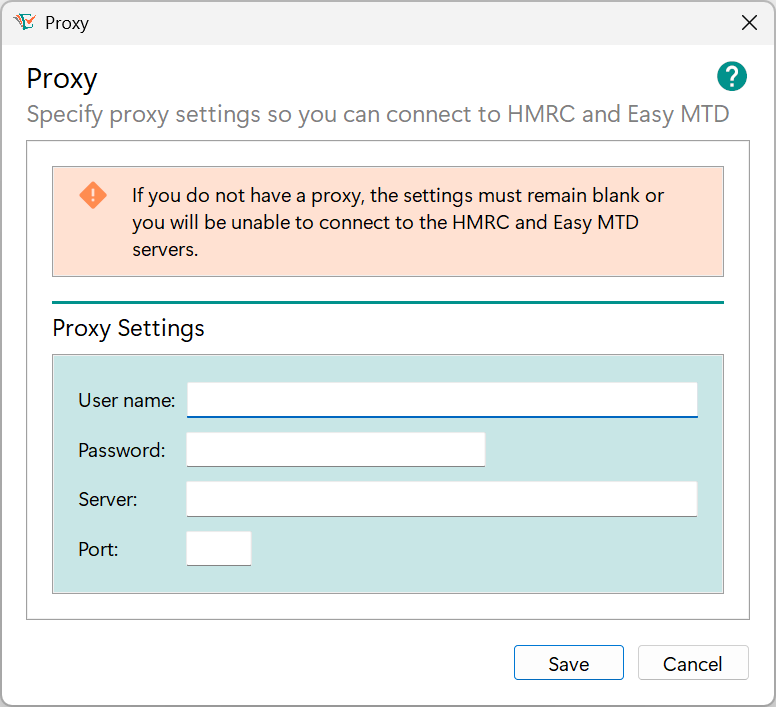
Fig. Proxy window
The following proxy settings are provided:
| Setting | Description |
|---|---|
| User Name | Determines the user name required to connect to the proxy server. |
| Password | Determines the password required to connect to the proxy server. |
| Server | Determines the name or IP address of the proxy server. |
| Port | Determines the port number of the proxy server. |
When all settings are specified, click the Save button to save the proxy settings and close the Proxy window.
Caution: Specifying invalid proxy settings causes the Easy MTD server and HMRC server to be inaccessible and the Connection Error window to be shown. Much of the functionality found in Easy MTD also becomes unusable.
Data Folder and Data Files
Easy MTD stores data relating to taxpayers, businesses and agents in individual data files – one data file for each taxpayer, business and agent. These are stored in a data folder which is in a default or user-specified location.
The data files are stored locally (i.e. not on the Easy MTD server) to help maintain the privacy of taxpayers, businesses and agents added to Easy MTD. Therefore, it is advised these data files are backed up in case the computer where Easy MTD is installed becomes inaccessible or they are deleted.
As soon as a taxpayer, business or agent is added, an associated data file is created.
Default Data Folder Location
By default, data files are stored in the following location:
- C:\ProgramData\Easy MTD\
Note: If the ProgramData folder cannot be viewed using Windows File Explorer, hidden items must be shown. To do this, click the View menu in Windows File Explorer followed by the Show option (if available) and tick the Hidden Items checkbox.
If Easy MTD VAT is installed, and a non-default data folder was specified, Easy MTD will adopt that data folder when it is launched for the first time and will continue to use it unless it is changed.
Changing the Data Folder
The data folder where data files are stored can be changed to any folder accessible to the computer where Easy MTD is installed. For example, for backup purposes it may be preferable to have the files stored in a documents folder, a network folder or within the Microsoft OneDrive environment.
To change the data folder, perform the following actions:
- Click the Data Folder option on the Options menu, the link in the Welcome section or the Options section to open the Data Folder window (see figure below).
- Click the Select button to open the Select Folder window (see figure below).
- Locate the required folder in the file system and click it to select it.
- Click the Select Folder button to close the Select Folder window.
- Click the Save button to save the data folder and close the Data Folder window.

Fig. Data Folder window
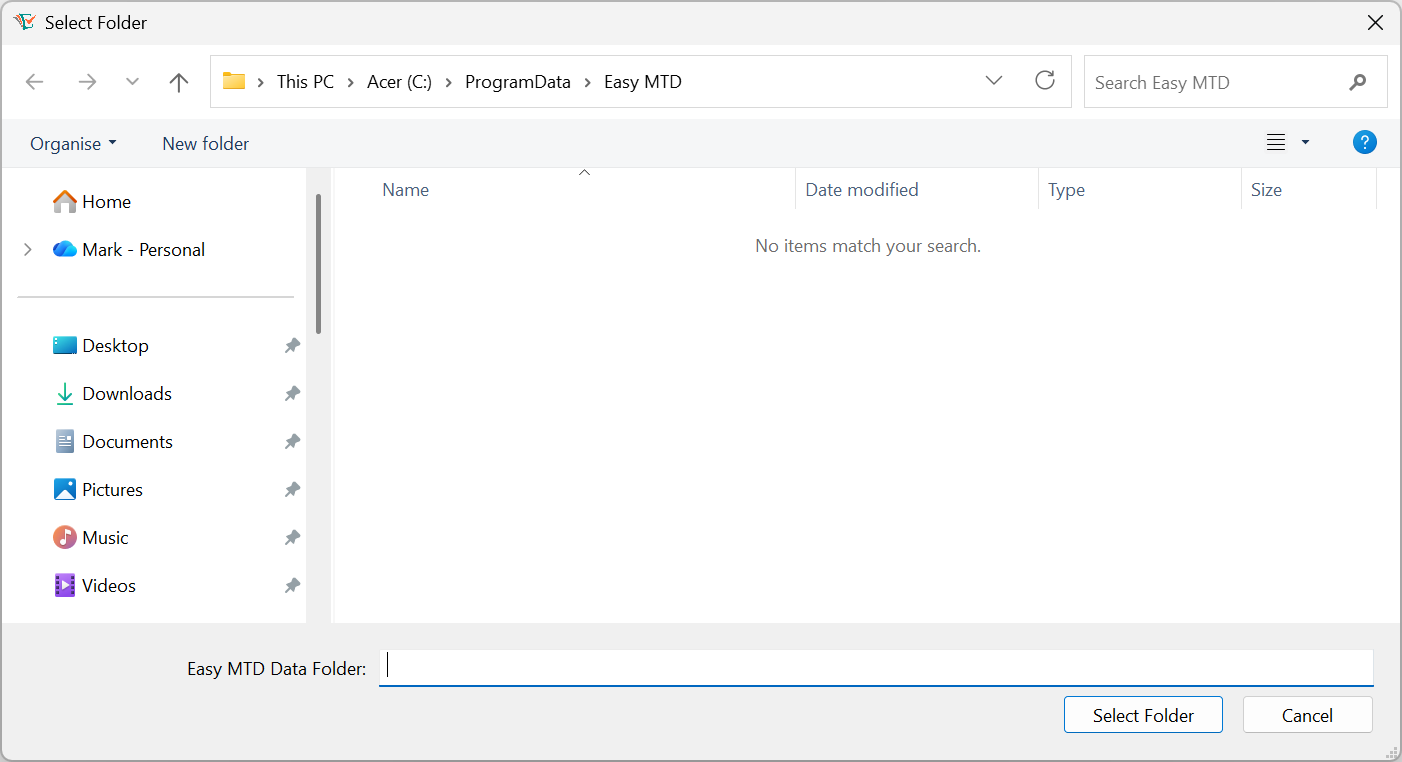
Fig. Select Folder window
Data File Content
The following data is held in each file:
| File | Data |
|---|---|
| n.taxpayer | Tax payer name, address, National Insurance number, notes, agent name, connection tokens, spreadsheet configuration settings |
| n.business | Business name, address, VAT registration number, notes, agent name, connection tokens, spreadsheet configuration settings |
| n.agent | Agent name, address, VAT registration number, notes, connection tokens |
Locking Data
To prevent corruption and overwriting of data, Easy MTD data files can only be accessed by a single instance of Easy MTD at any one time. This is based on the user who is logged into Windows where Easy MTD is being used.
The user name of the Windows user is stored in a file called Lock.dat in the same data folder where the data files are stored. If another instance of Easy MTD that uses the same data folder is launched by another Windows user, and the Lock.dat file exists, the Locked Data window (see figure above) is opened and further use of Easy MTD is prevented. This window indicates the user name of the Windows user that is causing the lock.
More: For further details about locking data, refer to Getting Started > Launching > Locked Data.
Removing the Lock
When Easy MTD is exited, the Lock.dat file is automatically deleted. This allows another instance of Easy MTD to be used by any Windows user. However, if the Lock.dat file is not deleted due to Easy MTD not being exited (e.g. Easy MTD crashes or Windows crashes), the Lock.dat file will remain and will prevent Easy MTD being used by Windows users whose user name is not specified in the Lock.dat file. To overcome this, perform one of the following actions:
- Launch Easy MTD with the same Windows user that previously launched it, and exit.
- Delete the Lock.dat file from the data folder.
- Change the name of the Windows user specified in the Lock.dat file to the Windows user who needs to use Easy MTD.
Backing Up Data Files
If data files are stored in a data folder that appears within the umbrella of a backup process, there may not be any need to use the backup functionality in Easy MTD. However, if extra peace of mind is required or a backup process is not in place, Easy MTD data files can be backed up locally or to the Easy MTD server in an encrypted format.
Backup functionality is not yet available in Easy MTD. When enabled, further information will be added to this section.
Preferences
Certain Easy MTD functionality can be enabled and disabled in the Preferences window (see figure below) which is opened by clicking the Preferences option on the Options menu, or the link in the Welcome section or the Options section:
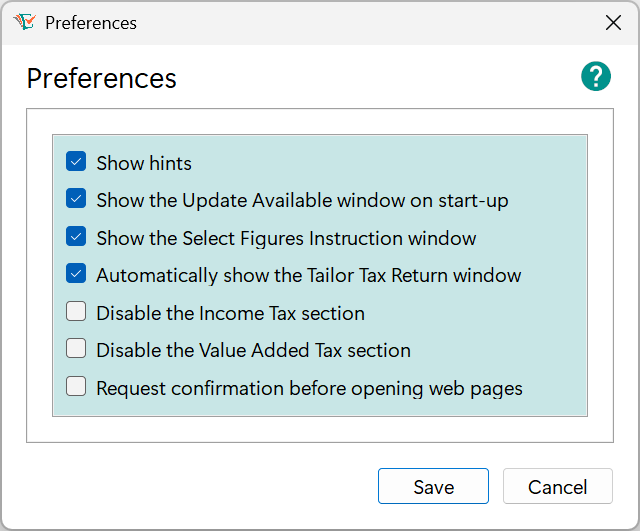
Fig. Preferences window
The following preferences appear in the Preferences window:
| Preference | Description |
|---|---|
| Show hints | Determines whether the hints are shown when the mouse cursor is hovered over certain components in the Easy MTD interface. Tick for yes (default). Blank for no. |
| Show the Update Available window on start-up | Determines whether the Update Available window is shown when Easy MTD is launched and an Easy MTD update is available. Tick for yes (default). Blank for no. |
| Show the Select Figures Instruction window | Determines whether the Select Figures Instructions window is shown when the Select Figures window is opened. Tick for yes (default). Blank for no. |
| Automatically show the Tailor Tax Return window | Determines whether the Tailor Tax Return window is automatically opened when the Income Tax section is opened and the Tailor Tax Return window has not been previously used to tailor the tax return. Tick for yes (default). Blank for no. |
| Automatically show the Business Not Found window | Determines whether the Business Not Found window is automatically opened when the Value Added Tax section is opened and a business has not been previously added. Tick for yes (default). Blank for no. |
| Disable the Income Tax section | Determines whether the Income Tax section and all associated components are disabled and inaccessible. Tick for yes. Blank for no (default). |
| Disable the Value Added Tax section | Determines whether the Value Added Tax section and all associated components are disabled and inaccessible. Tick for yes. Blank for no (default). |
| Request confirmation before opening web pages | Determines whether an Open Web Page in Browser window is opened when a URL link is clicked in Easy MTD. Tick for yes. Blank for no (default). |
Click a preference checkbox to add or remove a tick.
Viewing Notifications
From time to time, Fly Software will need to notify users about important news, changes to Easy MTD or when HMRC are performing maintenance or experiencing issues with their system. This information is presented in the Notifications panel at the bottom of the Welcome screen.
Only the latest notification is displayed in Easy MTD but a View History link is provided that opens the Notification History page on the Easy MTD website in the default browser:
Viewing the Version
The version number of Easy MTD is displayed below the menu on the left-hand side of the Easy MTD interface.
Getting Support
The following mechanisms for obtaining support are provided in Easy MTD:
- Support section
- Page and window specific help
More: An Ai helper called AskEasy, support tickets, help, guides and knowledge base, are found in the Support section of the Easy MTD website:
Support Section
The Support section provides access to the following resources:
- Help
- Guides
- Knowledge base
- HMRC services and guidance
Accessing
The Support section is opened by clicking the Support menu, or the Support link in the Welcome section.
Each of the resources found in the Support section open a web page on the Easy MTD website or HMRC website in the default browser. Click the associated option on the Support menu or the associated link in the Support section or Welcome section.
Page and Window Specific Help
Almost every page and window in Easy MTD contains a HMRC Help button ( ) and/or an Easy MTD Help button (
 ). These normally appear top right of the page or window.
Click the HMRC Help button to open a HMRC web page in the default browser that relates to the topic of the page or window.
Click the Easy MTD Help button to open a section of the Easy MTD Help web page in the default browser that relates to the topic of the page or window.
Exiting
To exit Easy MTD, click the close (x) button in the title bar of the main interface.
Note: It is important that Easy MTD is exited after use so the association with the current user is removed from the selected business and/or taxpayer. Failing to do this prevents the business and/or taxpayer from being selected and used by a different Windows user.
More: For further details about the locking businesses and taxpayers, refer to Getting Started > Data Files > Access to Data.
Using Easy MTD as an Agent
When Easy MTD is used by a tax agent or accountant to manage and file Income Tax and/or VAT on behalf of one or more clients, an agent business must be added to Easy MTD. Following this, any business and taxpayer managed by the agent must be assigned to this agent.
The following information appears in this section:
Accessing
All agent functionality appears on the Agents page (see figure below) which is accessed by clicking the Agents option on the Options menu, or the Agents link in the Welcome section or the Options section.
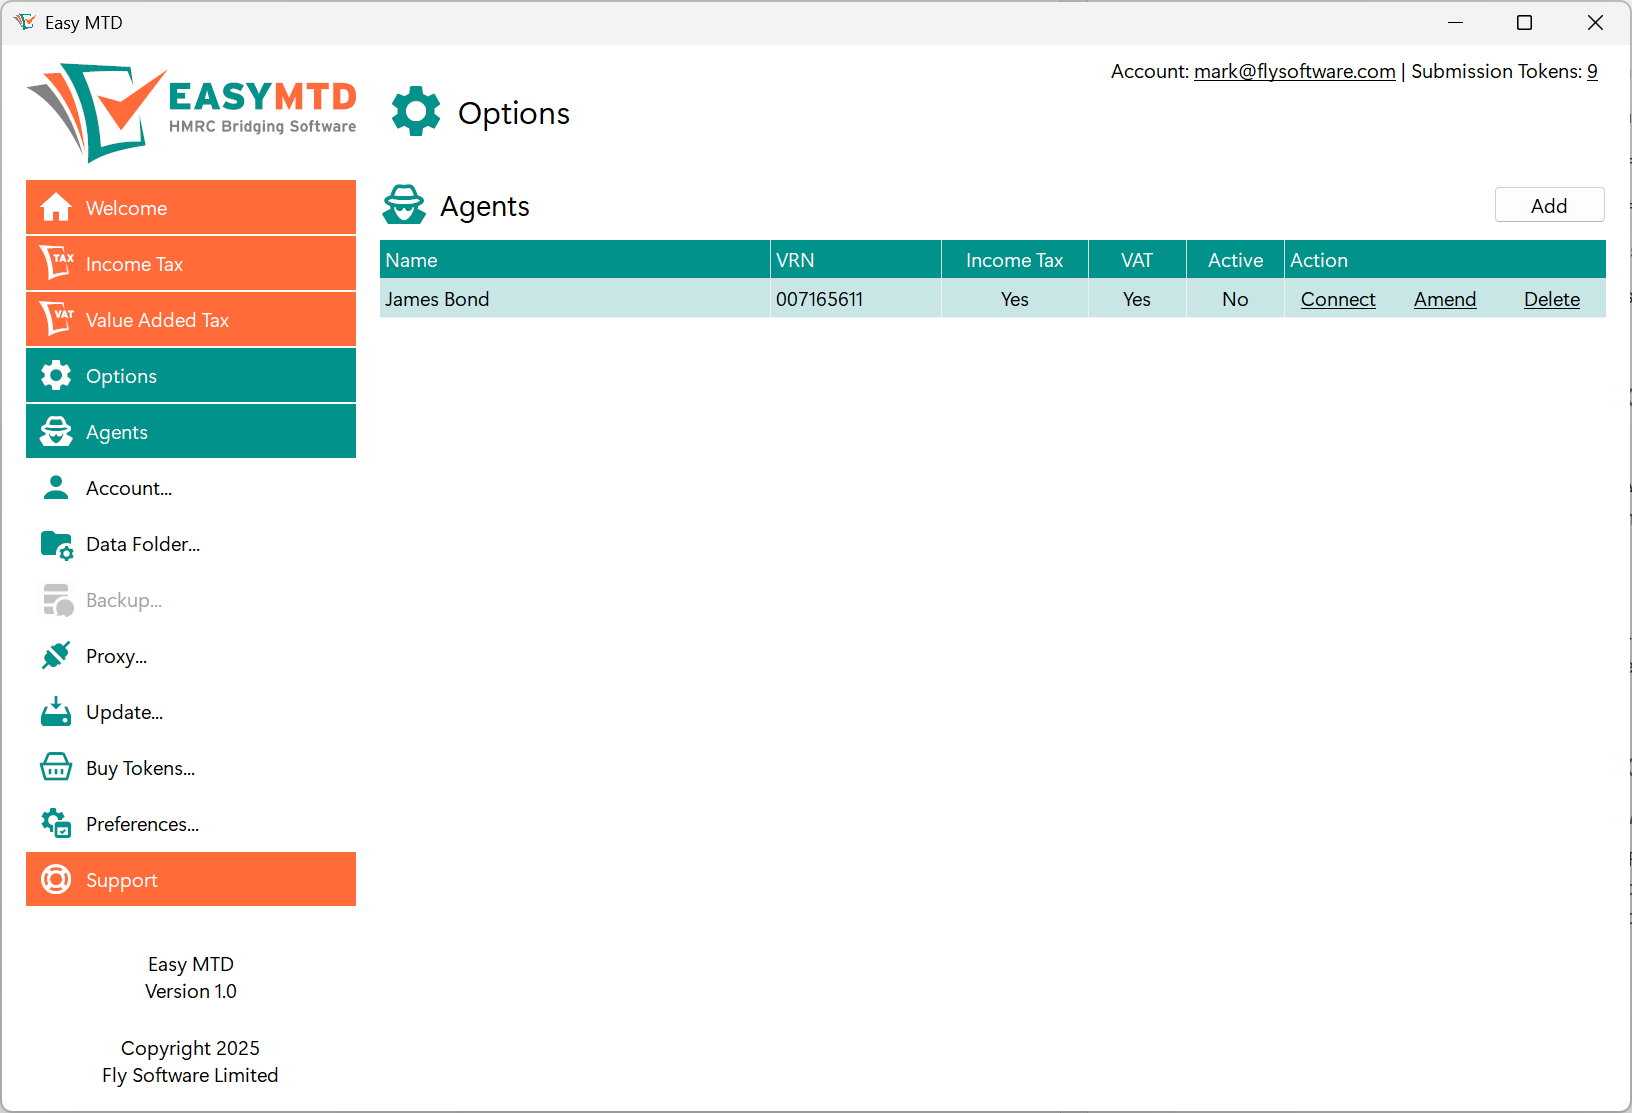
Fig. Agents page
HMRC Guidance
As an agent, there are a number of HMRC actions that must be performed before certain Income Tax and Value Added Tax functionality of Easy MTD can be used. For details, specify the applicable URL in a browser:
- Income Tax: gov.uk/government/collections/making-tax-digital-for-income-tax-as-an-agent-step-by-step
- VAT: gov.uk/guidance/making-tax-digital-for-vat-as-an-agent-step-by-step
Agent Details
The following agent details appear in the Add Agent window and Amend Agent window.
| Field | Description | Required |
|---|---|---|
| VAT registration number | The VAT registration number of the agent business (if applicable). It is only necessary to specify and lookup the VAT registration number of an agent business if a proof of check reference needs to be generated when assigning a taxpayer or business to the agent in the Add Taxpayer window, Modify Taxpayer window, Add Business window and Modify Business window. | No |
| Name | Identifies the agent in Easy MTD and is the name that appears in the Agent list box in the Add Taxpayer window, Modify Taxpayer window, Add Business window and Modify Business window. | Yes |
| Address | The address of the agent business. | No |
| Notes | Notes relating to the agent. | No |
| Enrolled HMRC services | Determines whether the agent is enrolled with HMRC for Income Tax or Value Added Tax. | No |
| Active | Determines whether the agent is active in Easy MTD. When set to Yes, the agent appears in the Agent list box in the Add Taxpayer window, Modify Taxpayer window, Add Business window and Modify Business window. | No |
Adding
To add an agent, perform the following actions on the Agents page:
- Click the Add button to open the Add Agent window (see figure below).
- If necessary, click inside the VAT registration number edit box and type the VAT registration number of the business. This field does not need to be specified if the agent business is not VAT registered.
- If a VAT registration number has been specified, click the Lookup button. If the VAT registration number is found, the associated agent business name appears in the Name edit box and the associated agent business address appears in the Address edit box. If the VAT registration number is not found, a VAT Registration Number Not Found window is opened. If the VAT registration number is invalid, an Invalid VAT Registration Number window is opened. Click the OK button to close either of the windows, and specify a valid VAT registration number or leave it blank.
- If necessary, click inside the Name edit box and specify or modify the agent business name.
- If necessary, click inside the Address edit box and specify or modify the agent business address.
- If necessary, click inside the Notes edit box and type relevant notes.
- If the agent will be used for submitting Income Tax, click the Enrolled HMRC services Income Tax checkbox.*
- If the agent will be used for submitting VAT, click the Enrolled HMRC services Value Added Tax checkbox.*
- Select the Active Yes option to make the agent active in the Easy MTD interface, or the No option to make it inactive.
- Click the Save button.
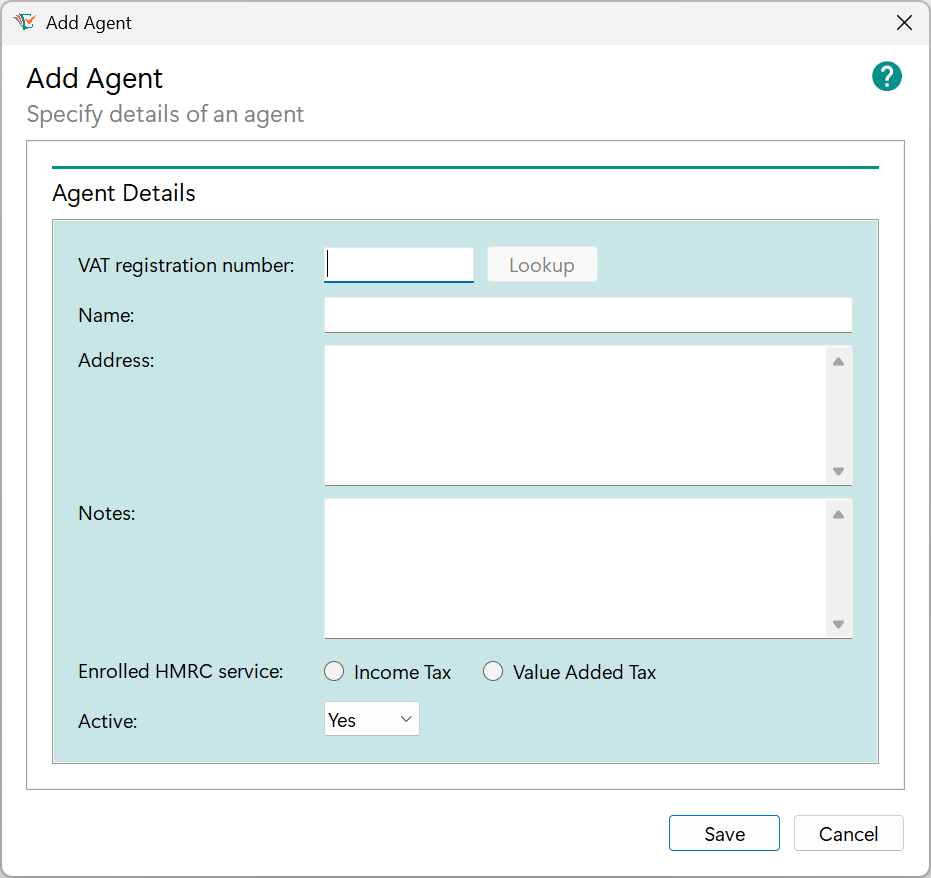
Fig. Add Agent window
Following this, the name of the agent appears on the Agents page and, if active, in the Agent list box in the Add Business, Amend Business, Add Taxpayer and Amend Taxpayer windows.
*Note Only one enrolled HMRC service can be selected for an agent in Easy MTD. Therefore, if you are an agent that needs to submit Income Tax and VAT, you will need to add two agents - one for Income Tax and one for VAT.
Amending
To amend an agent, perform the following actions on the Agents page:
- Click the Amend link for the applicable agent to open the Amend Agent window (see figure below).
- Make the necessary amendments.
- Click the Save button.
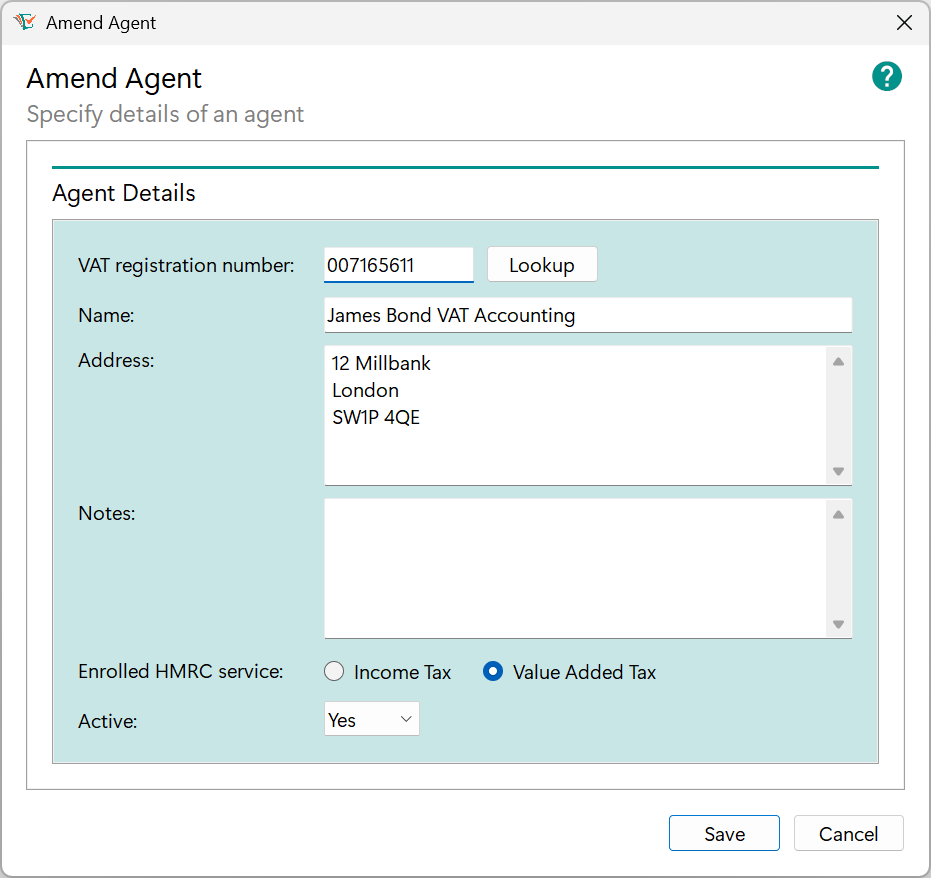
Fig. Amend Agent window
More: For further details about specifying fields, refer to Agents > Adding.
Deleting
To delete an agent, perform the following actions on the Agents page:
- Click the Delete link for the applicable agent to open a Confirm Delete window.
- To confirm the delete and close the window, click the Yes button. To cancel the delete and close the window, click the No button.
Following this, the agent is removed from the Agents page and the Agent list box in the Add Taxpayer window, Amend Taxpayer window, Add Business window and Amend Business window. Any taxpayers and/or businesses that were previously associated with the agent are no longer associated with it.
Connecting
For details about connecting Easy MTD with HMRC on behalf of an agent, refer to Connecting Easy MTD with HMRC.
Connecting Easy MTD with HMRC
Before Income Tax or Value Added Tax functionality can be used, Easy MTD must be allowed to connect with HMRC on behalf of a taxpayer, business or agent.
The following information appears in this section:
Credentials and Requirements
The credentials and requirements for connecting Easy MTD to HMRC are dependent on whether it is being performed for an individual taxpayer or business, or all taxpayers and businesses managed by an agent:
| Connecting For | Sign In Credentials | Requirements |
|---|---|---|
| Individual taxpayer | The Government Gateway user ID and password, or GOV.UK One Login email that is associated with the taxpayer. | The taxpayer must be registered for Making Tax Digital for Income Tax. |
| Individual business | The Government Gateway user ID and password, or GOV.UK One Login email that is associated with the business. | The business must be registered for Making Tax Digital for VAT. |
| All taxpayers and businesses managed by an agent | The agent services account user ID and password associated with the agent. | Each taxpayer and business must be assigned to the agent in Easy MTD and associated with their agent services account. The taxpayers must be registered for Making Tax Digital for Income Tax and the businesses must be registered for Making Tax Digital for VAT. |
Connection Process
To allow Easy MTD to connect with HMRC on behalf of a taxpayer or business, or all taxpayers and businesses managed by an agent, perform the following actions:
- Click the applicable Connect link on the Taxpayers page, Businesses page or Agents page to open the Connect to HMRC window and the "Allow your software to connect with HMRC" page (see figure below) in the default browser.
- Work through the prompts and pages until the “Sign in to HMRC” page is opened.
- Select either the Government Gateway or GOV.UK One Login option and click the Continue button.
- Specify the applicable sign in credentials and satisfy any further sign in requirements. Refer to Credentials and Requirements for further details about what credentials to use.
- On a second "Allow your software to connect with HMRC" page, click the Give permission button.
- On the "You gave permission to Easy MTD" page, click the Copy button to copy the authorisation code to the Windows Clipboard.
- In the Connect to HMRC window of Easy MTD, click the Paste Code button to paste the copied code into the Code edit box.
- Click the Connect Now button.
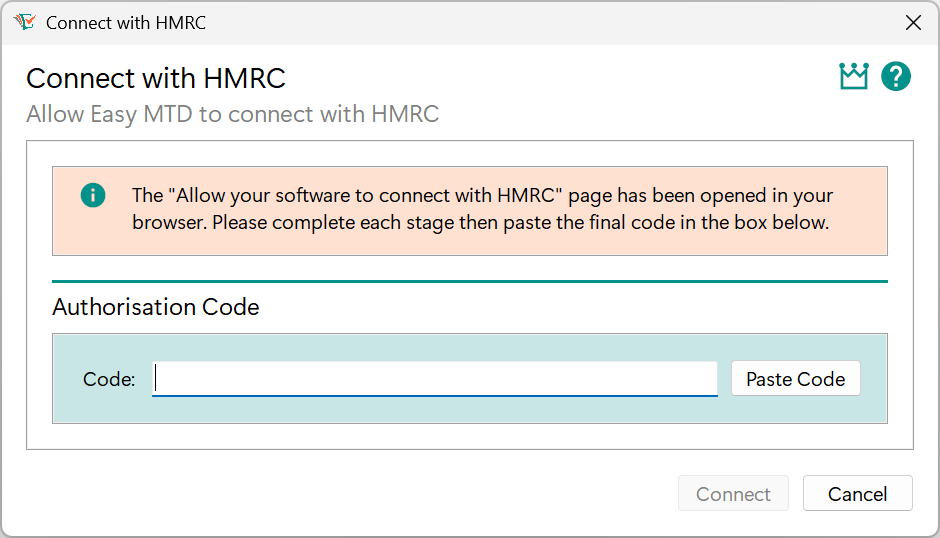
Fig. Connect with HMRC window
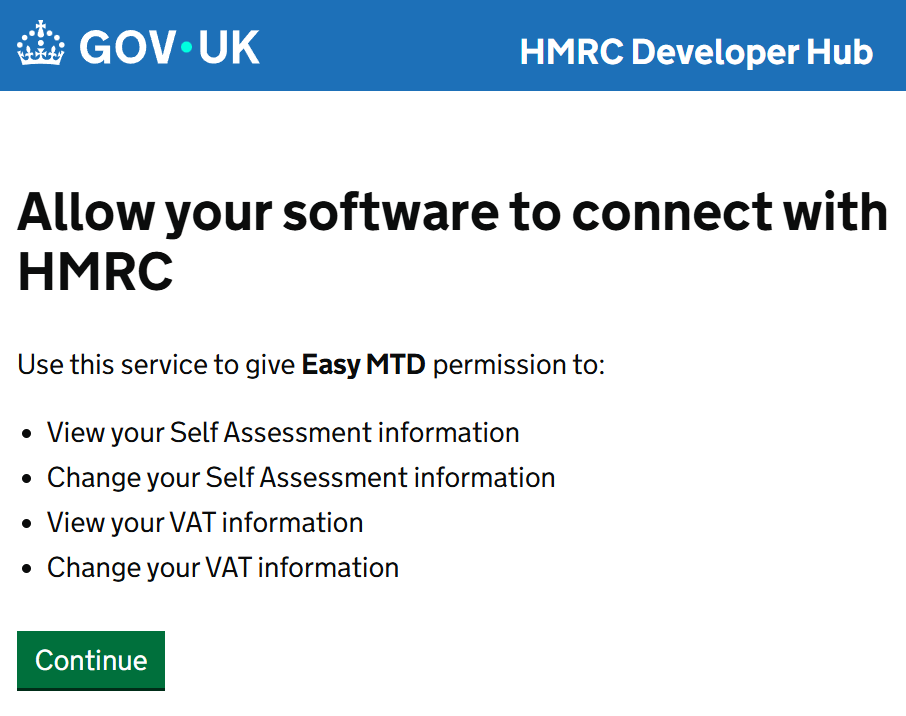
Fig. Allow your software to connect with HMRC page
If connecting is successful, the Connect With HMRC window is closed and the Connected to HMRC window is opened. To close this window, click the OK button.
If the pasted authorisation code is invalid, an Invalid Code window is opened. To close this window and return to the Connect With HMRC window, click the OK button.
Note: The authorisation code is NOT the code sent to your phone by HMRC or displayed in your authenticator app during the process of signing-in to the Government Gateway. The code you paste is 32 characters and is shown on the final HMRC page of the connection process.
If connecting is unsuccessful, the Connect With HMRC window is closed and the Connection With HMRC Failed window is opened. To close this window, click the OK button.
Considerations
When connecting Easy MTD to HMRC, the following should be considered:
- The connection is only granted for 18 months from the current date.
- Connecting again is permissible at any time. Doing so resets the 18 month period for which the connection is granted.
- If Easy MTD is installed on another PC/laptop, connection will need to be granted again for each taxpayer, business and/or agent unless the same data folder is being used for both installations.
- The connection for a taxpayer or business is removed when an agent is assigned to a taxpayer or business, and connection has not been granted for that agent.
- The connection for a taxpayer or business is removed when an agent is unassigned from a taxpayer or business, and the taxpayer or business was not previously connected.
Removing a Connection
The connection with HMRC automatically expires after 18 months and it is not necessary to remove the connection if another Making Tax Digital solution is used for a taxpayer, business or agent. However, if required, the following HMRC web page will begin the process of removing a connection (requires sign in to an applicable HMRC online services account):
Income Tax
Coming soon!
Value Added Tax
The Value Added Tax section of Easy MTD provides the necessary functionality for managing businesses, submitting VAT returns and viewing VAT returns and account information.
The following information appears in this section:
- Accessing
- Components
- Managing Businesses
- Specifying the Year To Date
- Viewing Obligations
- Submitting a VAT Return
- Viewing a VAT Return and Submission Receipt
- Viewing VAT Account Information
- Checking Service Availability
Accessing
All VAT functionality appears in the Value Added Tax section (see figure below) which is accessed by clicking the Value Added Tax menu, or the Value Added Tax link in the Welcome section.
Components
The following screenshot (see figure below) and table describe the components found in the Value Added Tax section.
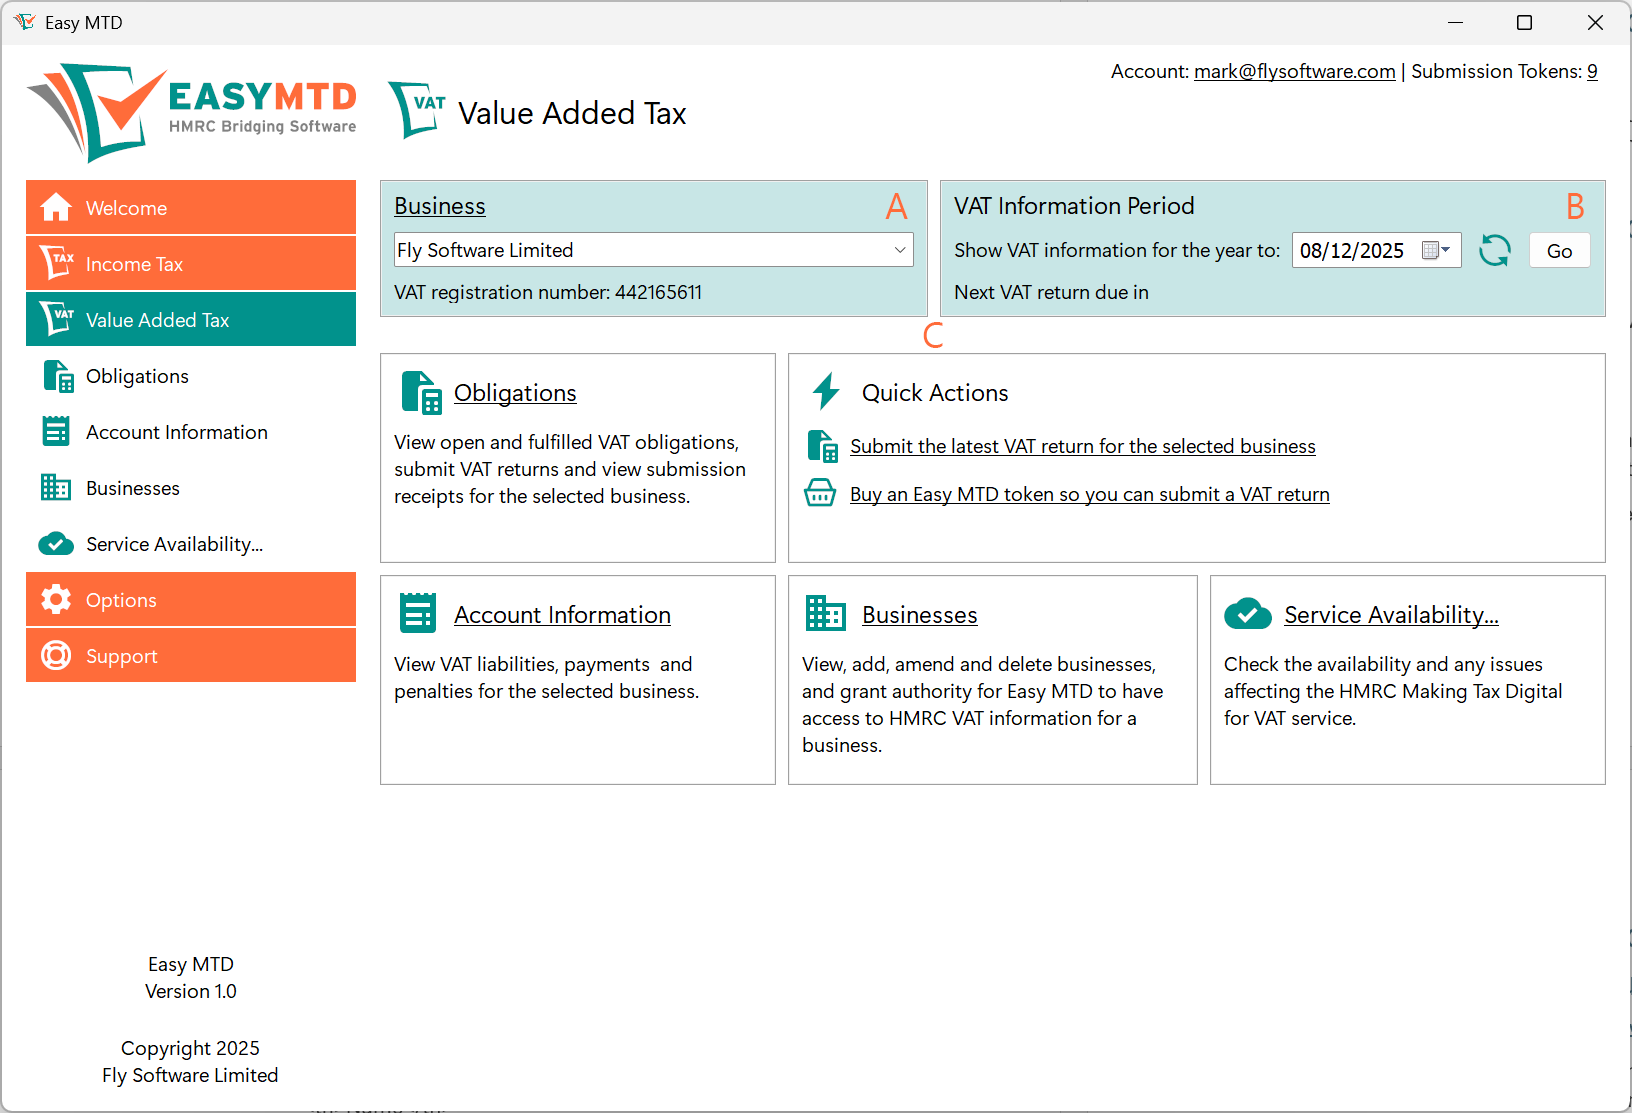
Fig. Value Added Tax section
| Label | Name | Description |
|---|---|---|
| A | Business panel | Contains a list box for selecting a business and shows the VAT registration number of the selected business. |
| B | VAT Information Period | Contains a date control for specifying the year to date with the default being the current date. A Reset button is provided to reset the date to the current date. The number of days until the next VAT return is due is also displayed if obligations for the selected business have been retrieved.. |
| C | Page | Shows information relating to the selected page in the Value Added Tax section. |
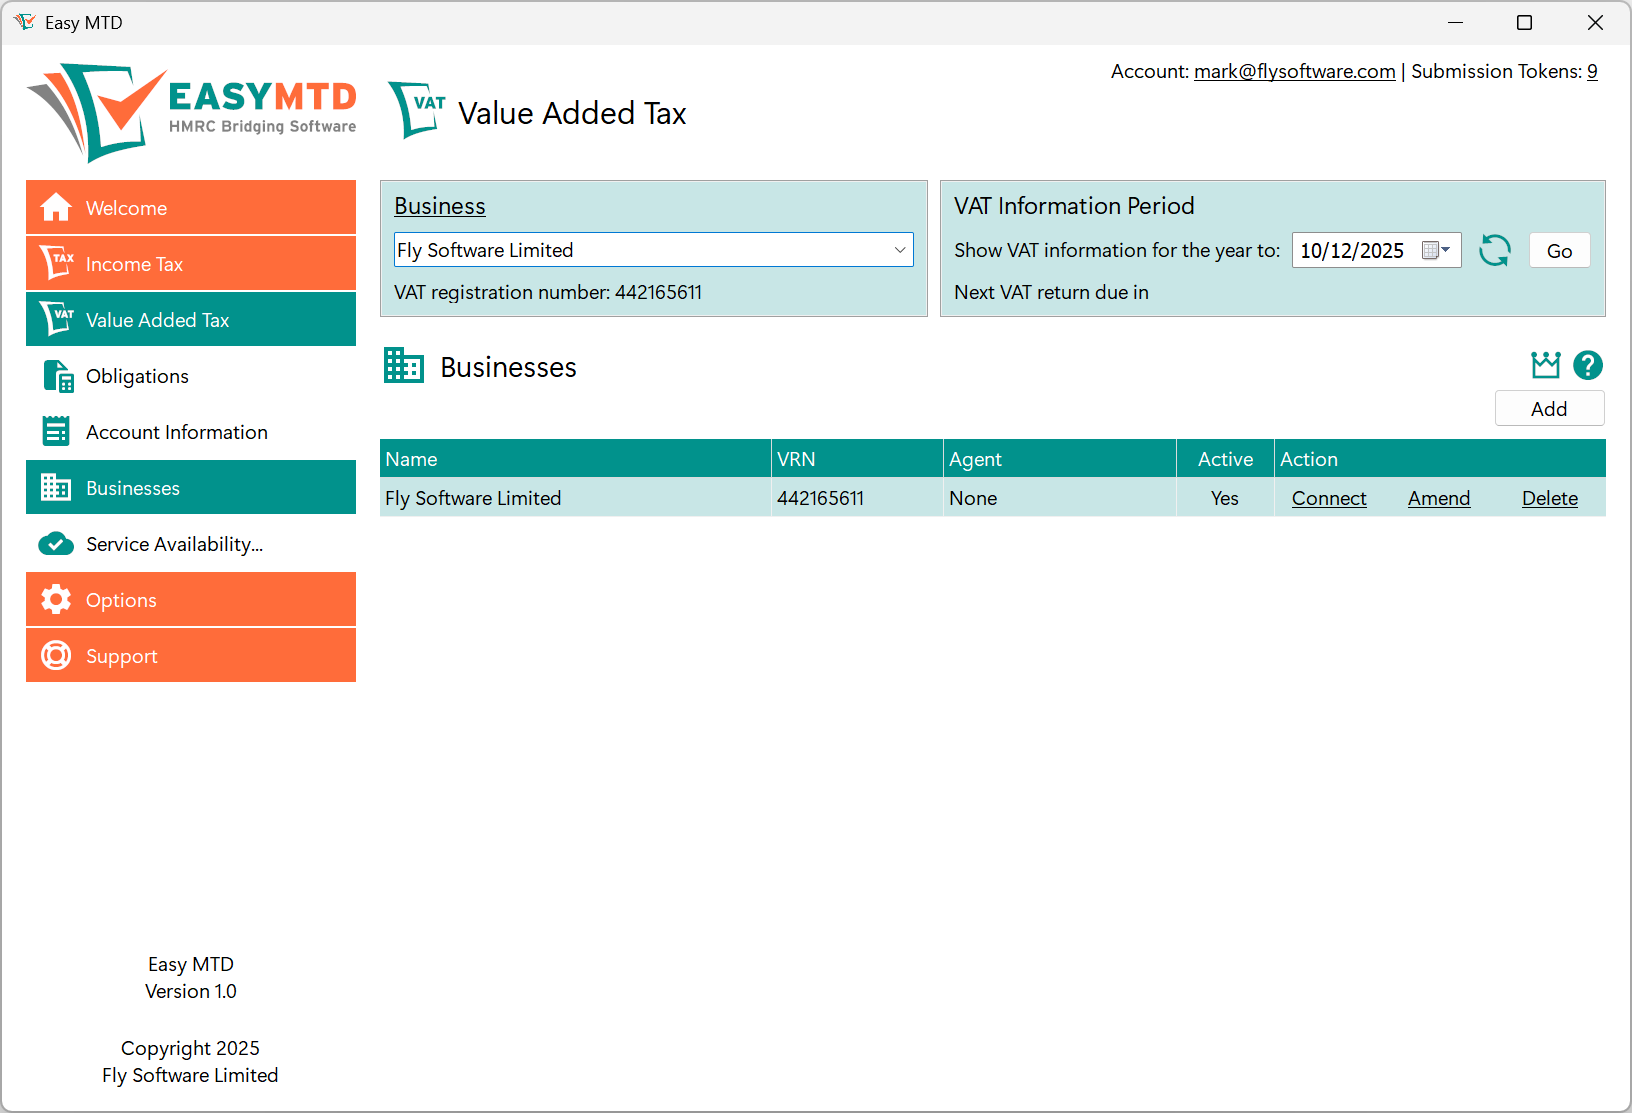
Managing Businesses
VAT returns are submitted for businesses so one or more businesses will need to be managed in Easy MTD.
Accessing
All business functionality appears on the Businesses page (see figure below) which is accessed by clicking the Businesses option on the Value Added Tax menu, or the Businesses link in the Welcome section or the Value Added Tax section.
Business Details
The following business details appear in the Add Business window and Amend Business window.
| Field | Description | Required |
|---|---|---|
| VAT Registration Number | The VAT registration number of the business. | No |
| Name | Identifies the business in Easy MTD. | Yes |
| Address | The address of the business. | No |
| Notes | Notes relating to the business. | No |
| Active | Determines whether the business is active in Easy MTD. When set to Yes, the business appears in the list box in the Business panel. | No |
Selecting a Business
Before obligations and account information can be retrieved from HMRC, a business must be selected if one is not already selected or the wrong one is selected. There are two ways to do this:
- Click the business on the Businesses page.
- Click the list box in the Business panel and select the business.
Adding
To add a business, perform the following actions on the Businesses page:
- Click the Add button to open the Add Business window (see figure below).
- Click inside the VAT registration number edit box and type the VAT registration number of the business.
- Click the Lookup button. If the VAT registration number is found, the associated business name appears in the Name edit box and the associated business address appears in the Address edit box. If the VAT registration number is not found, a VAT Registration Number Not Found window is opened. If the VAT registration number is invalid, an Invalid VAT Registration Number window is opened. Click the OK button to close either of the windows, and specify a valid VAT registration number.
- If necessary, click inside the Name edit box and specify or modify the business name.
- If necessary, click inside the Address edit box and specify or modify the business address.
- If necessary, click inside the Notes edit box and type relevant notes.
- Select the Active Yes option to make the business active in the Easy MTD interface, or the No option to make it inactive.
- Click the Save button.
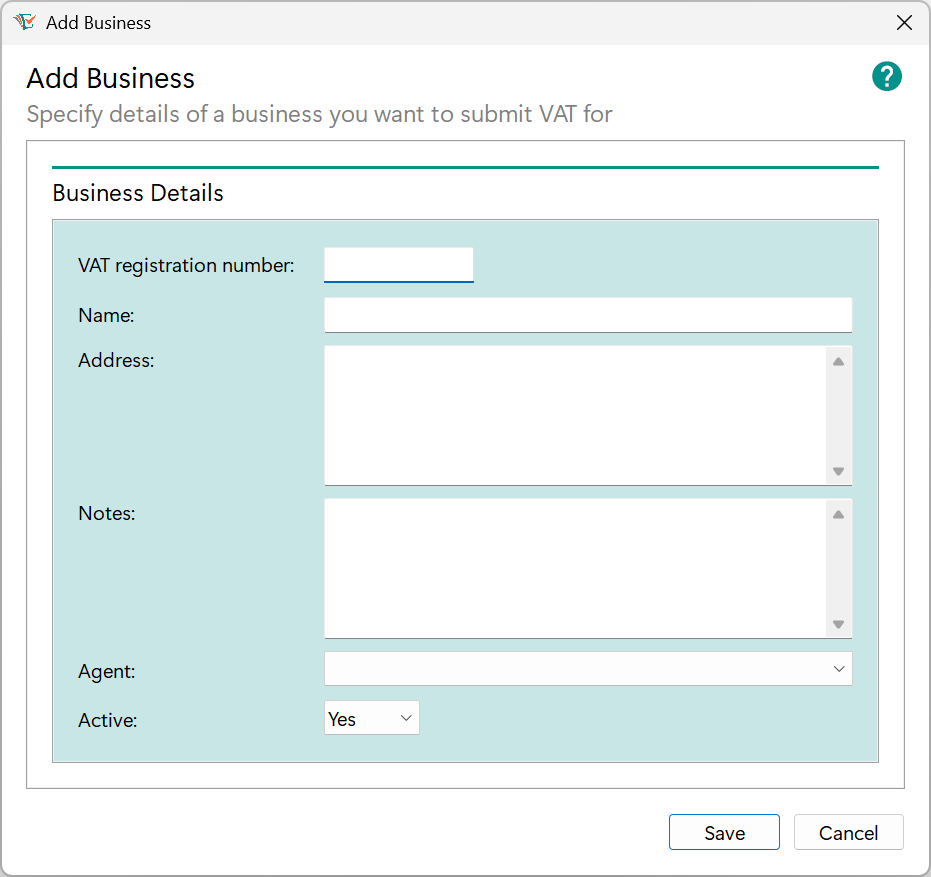
Fig. Add Business window
Following this, the name of the business appears on the Businesses page and, if active, in the list box in the Business panel.
Amending
To amend a business, perform the following actions on the Businesses page:
- Click the Amend link for the applicable business to open the Amend Business window (see figure below).
- Make the necessary amendments.
- Click the Save button.
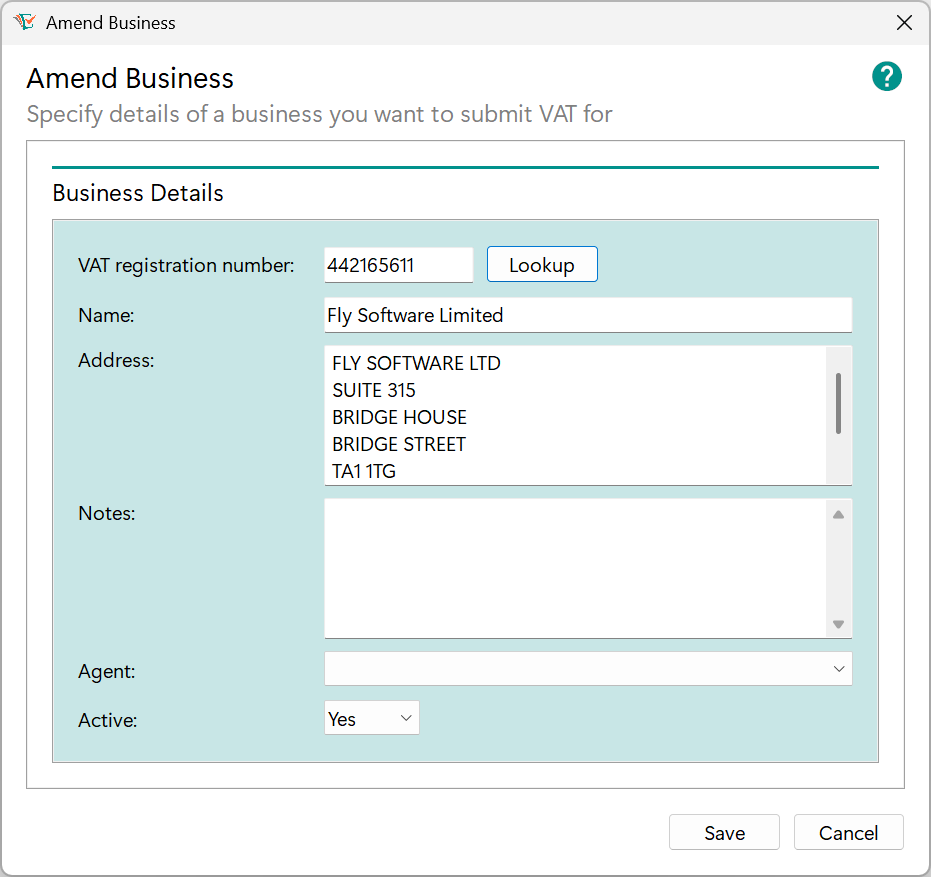
Fig. Amend Business window
More: For further details about specifying fields, refer to Businesses > Adding.
Deleting
To delete a business, perform the following actions on the Businesses page:
- Click the Delete link for the applicable business to open a Confirm Delete window.
- To confirm the delete and close the window, click the Yes button. To cancel the delete and close the window, click the No button.
Following this, the business is removed from the Businesses page and the list box in the Business panel.
Connecting
For details about connecting Easy MTD with HMRC on behalf of a business, refer to Connecting Easy MTD with HMRC.
Specifying a Year To Date
To determine what obligations and account information appear in Easy MTD for the selected business, a year to date must be specified or the default used.
By default, the year to date is 12 months in the past from the current date and this is normally suitable. The date can be changed but HMRC only allow obligations and account information within a maximum 12 month range to be viewed.
Note: The year to date is based on the Easy MTD server UTC setting - either UTC+01:00 (e.g. British Summer Time) or UTC+00:00 (e.g. Greenwich Mean Time), and the local Windows UTC setting is not used.
Click the date in the VAT Information Period panel found on any page in the Value Added Tax section. The Date control (see figure below) is opened where the day, month and year can be selected. When the required date is selected, click the tick button to apply the date.
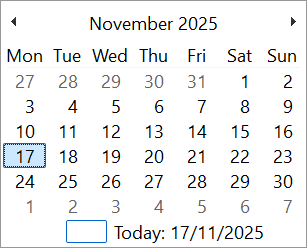
Fig. Calendar pop-up
Note: Specifying a date in the future is not permitted.
Resetting to the Default Date
To return the year to date to its default (e.g. the current date), click the Reset button ( ) in the VAT Information Period panel found on any page in the Value Added Tax section.
Viewing Obligations
Before a VAT return can be submitted or a VAT return and its associated submission receipt can be viewed, the Obligations page (see figure below) must be opened. This is accessed by clicking the Obligation option on the Value Added Tax menu, or the Obligations link in the Welcome section or Value Added Tax section.
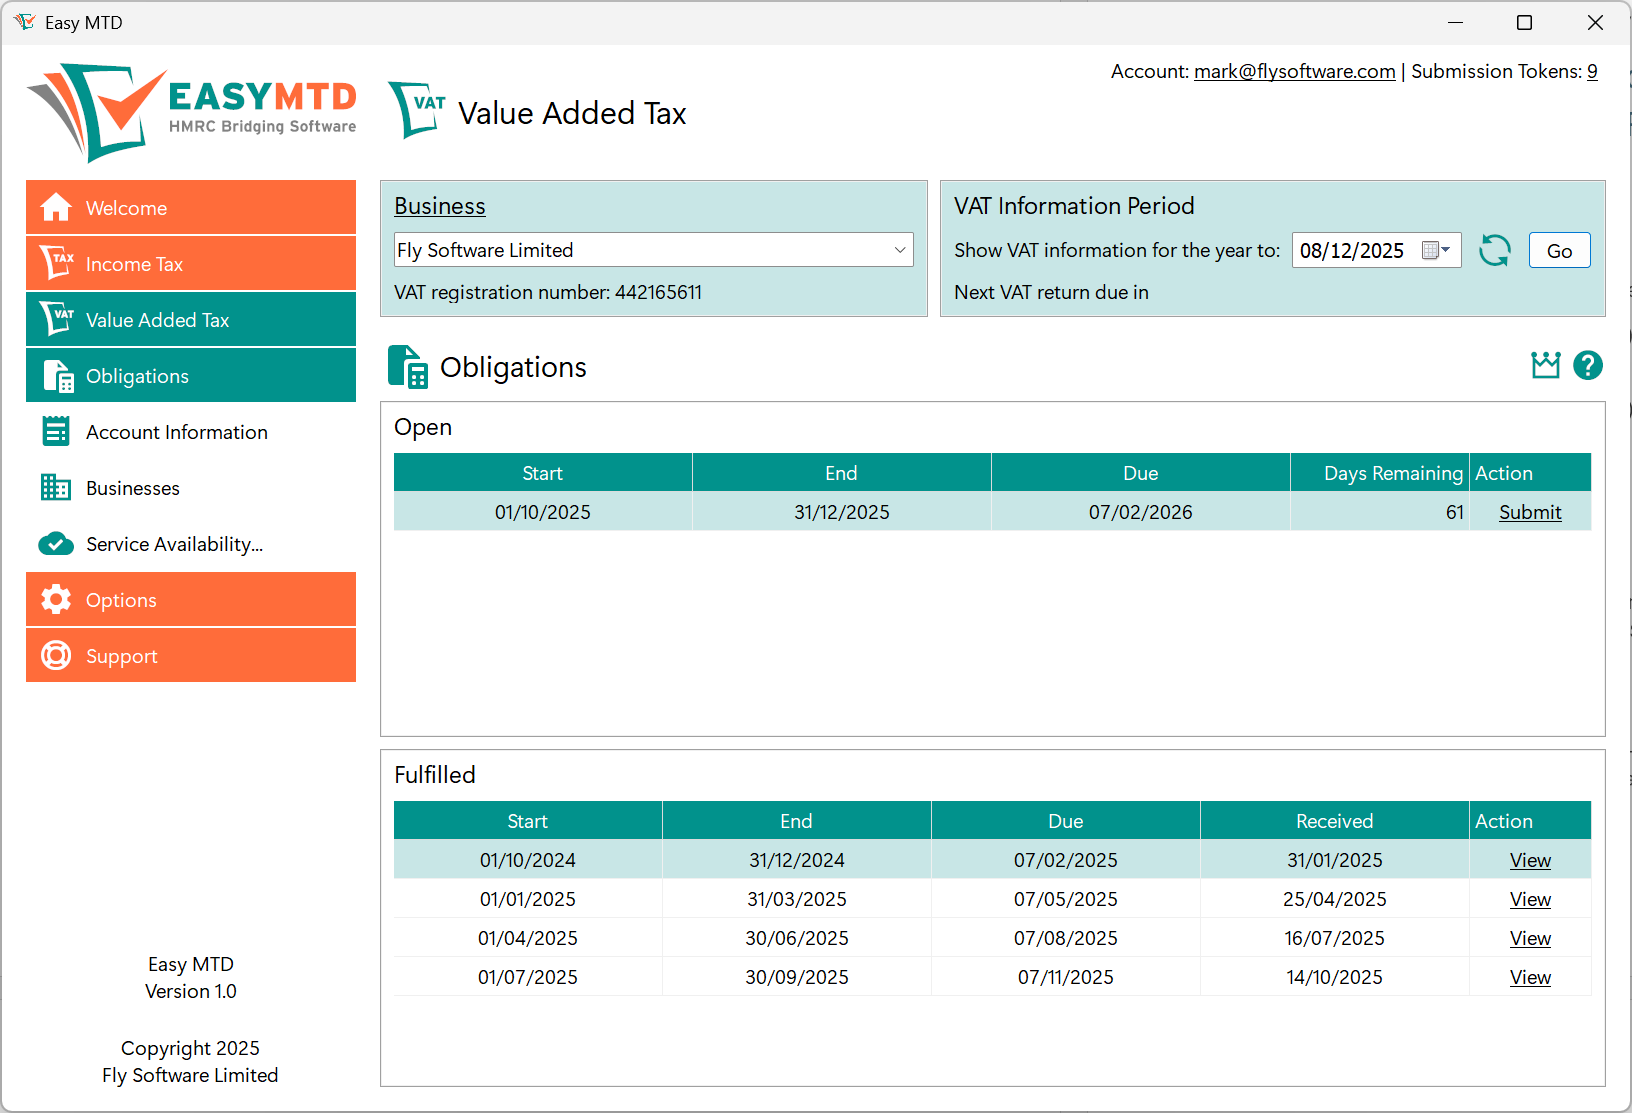
Fig. Obligations page
Submitting a VAT Return
To begin the VAT return submission process, select the applicable business, open the Obligations page and click the Submit link of the open obligation that needs to be submitted. Following this, the Submit VAT Return window is opened (see figure below)*.
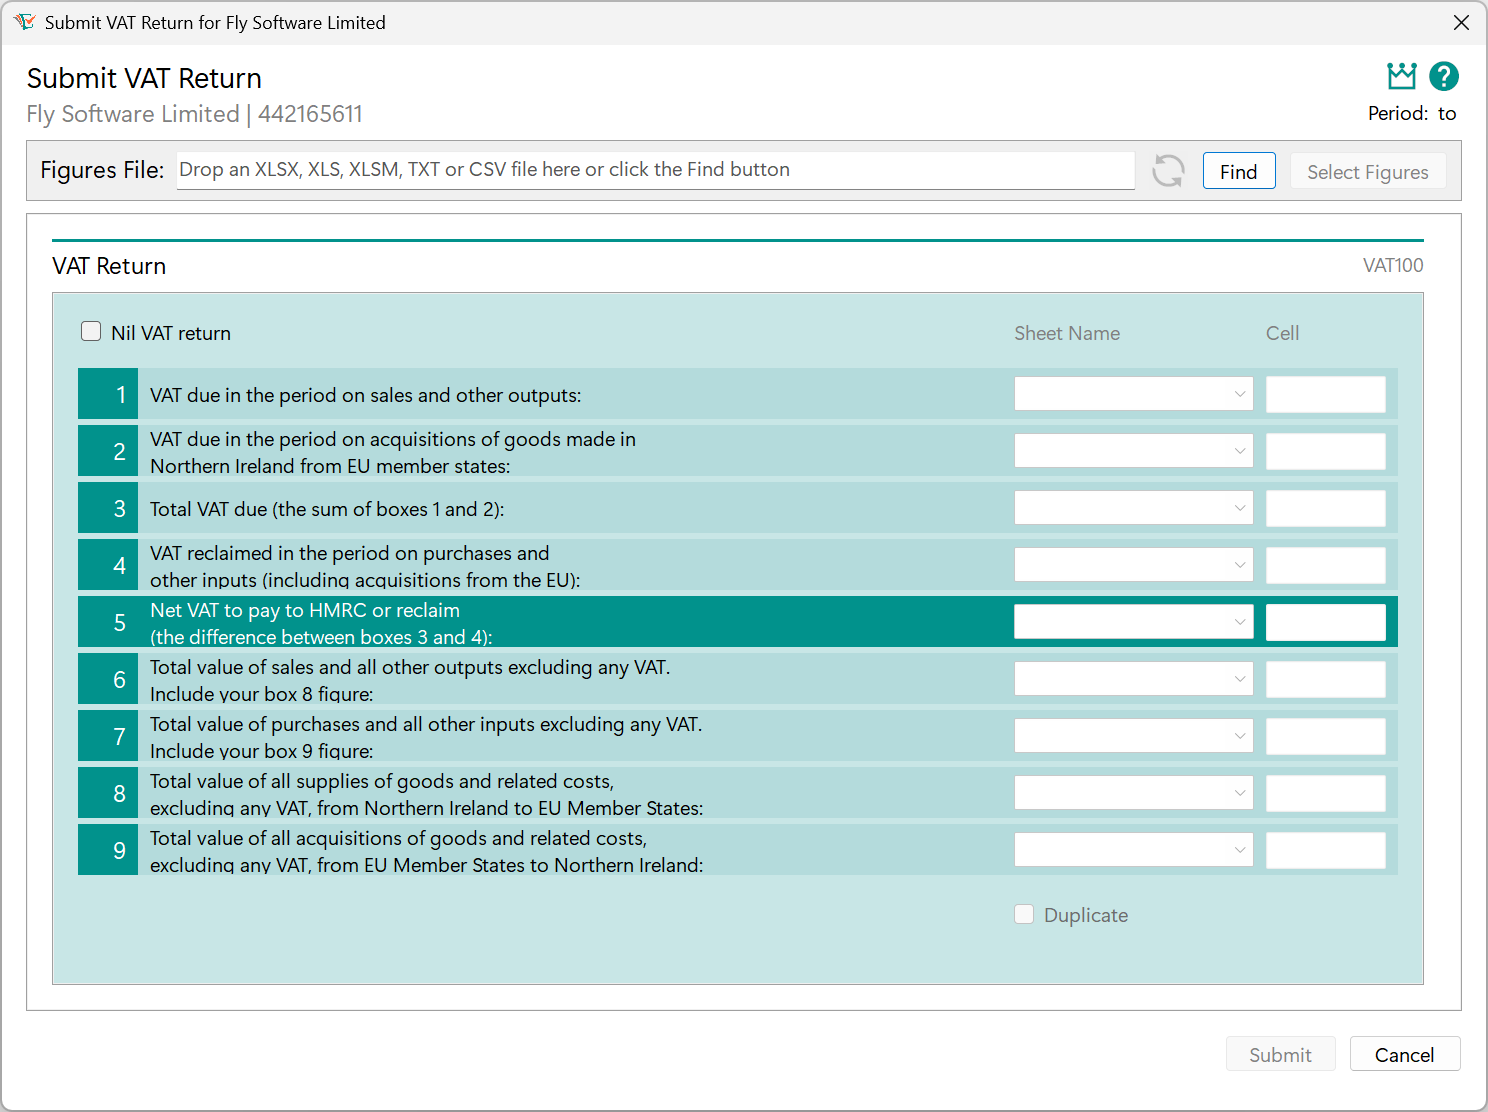
Fig. Submit VAT Return window
*Note: If an Easy MTD account has not been specified in Easy MTD, an Account Not Specified window is opened indicating this. Click the Account button to close this window and open the Account window where an account email and password can be specified. When complete, click the Save button to close the Account window and begin the VAT return submission process again.
Specifying VAT Figures
Nine valid VAT figures must appear in the Submit VAT Return window before a VAT return can be submitted. Due to HMRC digital link rules, these VAT figures cannot be specified manually and instead must be retrieved from an Excel (xlsx, xls, xlsm), text (txt) or comma separated values (csv) file.
More: For details about retrieving VAT figures, refer to Dealing with Figures.
Valid VAT Figures
Before a VAT return can be submitted, the VAT figures that appear in the Submit VAT Return window must adhere to the following HMRC rules:
| Box | Description | Rule | Excel Cell Format | Example |
|---|---|---|---|---|
| 1 | VAT due in the period on sales and other outputs | 2 or less decimal places | Number. 2 decimal places | 316995.55 |
| 2 | VAT due in the period on acquisitions of goods made in Northern Ireland from EU member states | 2 or less decimal places | Number. 2 decimal places | 236102.59 |
| 3 | Total VAT due | Sum of box 1 and box 2. 2 or less decimal places | Number. 2 decimal places | 553098.14 |
| 4 | VAT reclaimed in the period on purchases and other inputs (including acquisitions from the EU) | 2 or less decimal places | Number. 2 decimal places | 253485.37 |
| 5 | Net VAT to pay to HMRC or reclaim | Either box 3 - box 4 or box 4 - box 3, whichever produces a positive value*. 2 or less decimal places. To indicate whether the box 5 value will be reclaimed from HMRC or paid to HMRC, Reclaim or Pay will appear to the right of the box 5 description. | Number. 2 decimal places | 299612.77 |
| 6 | Total value of sales and all other outputs excluding any VAT. Include your box 8 figure | Whole number | Number. 0 decimal places | 2950339 |
| 7 | Total value of purchases and all other inputs excluding any VAT. Include your box 9 figure | Whole number | Number. 0 decimal places | 2417408 |
| 8 | Total value of all supplies of goods and related costs, excluding any VAT, from Northern Ireland to EU member states | Whole number | Number. 0 decimal places | 212112 |
| 9 | Total value of all acquisitions of goods and related costs, excluding any VAT, from EU member states to Northern Ireland. | Whole number | Number. 0 decimal places | 1194723 |
If certain VAT figures are invalid for certain reasons, Easy MTD automatically corrects them.
*Note: For further details about ensuring a positive value for the box 5 figure, refer to the following knowledge base article on the Easy MTD website:
Correction of Invalid and Missing VAT Figures
To make submitting a VAT return as quick and simple as possible, Easy MTD automatically corrects certain invalid VAT figures using HMRC rules, or performs a calculation or applies a zero. The table below describes the corrections that are made:
| Box | Reason for being Invalid | Correction Made | Example |
|---|---|---|---|
| 1, 2, 3, 4, 5 | More than 2 decimal places | Round to 2 decimal places | 2357.2144 becomes 2357.21 |
| 6, 7, 8, 9 | Not a whole number | Round down to a whole number (0 decimal places) | 2357.21 becomes 2357 |
| 3 | Missing from the Excel (xlsx, xls, xlsm), text (txt) or comma-separated values (csv) file, or the Sheet Name is not selected and the Cell not specified | Calculate using the sum of box 1 and box 2 | 500.00 (box 1) + 200.00 (box 2) = 700.00 |
| 5 | Missing from the Excel (xlsx, xls, xlsm), text (txt) or comma-separated values (csv) file, or the Sheet Name is not selected and the Cell is not specified | Calculate using the difference between box 3 and box 4 | 700.00 (box 3) - 200.00 (box 4) = 500.00 |
| 2 | Missing from the Excel (xlsx, xls, xlsm), text (txt) or comma-separated values (csv) file, or the Sheet Name is not selected and the Cell is not specified | Use 0.00 | 0.00 |
| 8, 9 | Missing from the Excel (xlsx, xls, xlsm), text (txt) or comma-separated values (csv) file, or the Sheet Name is not selected and the Cell is not specified | Use 0 | 0 |
If any of the above corrections are made, a warning is shown for the associated box number and a message appears in the Submission window prior to submitting the VAT return to HMRC.
Note: VAT figures in the selected Excel (xlsx, xls, xlsm), text (txt) or comma-separated values (csv) file are not changed or added to reflect any correction made by Easy MTD.
Applying Zero to Box 2, Box 8 and Box 9
For some businesses, box 2, box 8 and box 9 are not applicable because no trading between Northern Ireland and EU member states occurs. This means the VAT figures associated with these boxes are zero. When this is applicable, it is not necessary for the zero figures to appear in the Excel (xlsx, xls, xlsm), text (txt) or comma separated values (csv) file – but they can be if preferred.
If omitted from the Excel (xlsx, xls, xlsm) file, ensure the associated Sheet Name and Cell settings are blank.
Calculating Box 3 and Box 5
To automatically calculate box 3 and/or box 5 VAT figures using HMRC rules, omit the figures from the Excel (xlsx, xls, xlsm), text (txt) or comma separated values (csv) file.
If omitted from the Excel (xlsx, xls, xlsm) file, ensure the associated Sheet Name and Cell settings are blank.
Nil VAT Returns
A nil VAT return can be submitted in one of the following ways:
- Click the Nil VAT Return checkbox in The Submit VAT Return window to add a tick to it.
- Select an Excel (xlsx, xls, xlsm), text (txt) or comma-separated values (csv) file that contains zero values for the nine VAT figures (or at least VAT figures for box 1, box 4, box 6 and box 7).
Submitting
When all VAT figures in the Submit VAT Return window are valid (i.e. none of the boxes are red), click the Submit button. Following this, a Submit VAT Return Declaration window (see figure below) is opened. The content of this window is dependent on whether a VAT return is being submitted for an individual business or an agent submitting on behalf of a business.
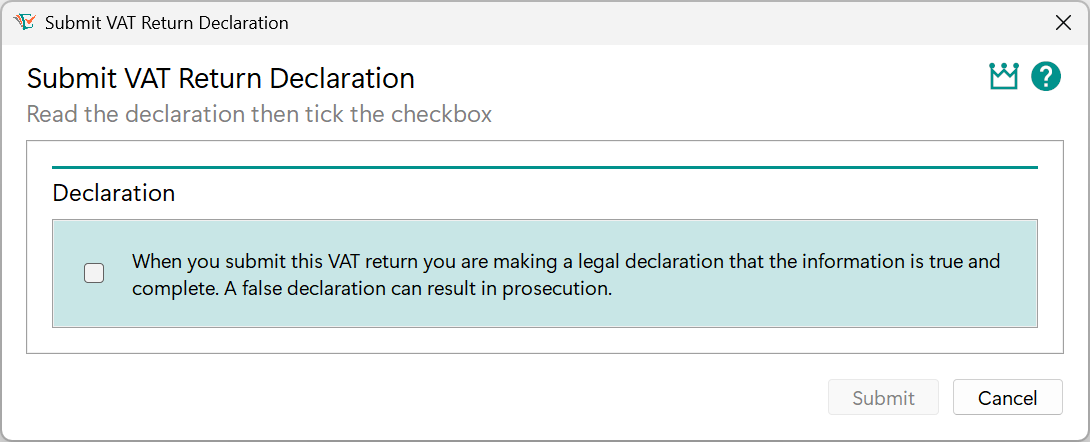
Fig. Submit VAT Return Declaration (Business) window
Note: If one or more VAT figures have warnings (i.e. the associated box number is orange), the Submission window also contains text indicating this.
To agree to the declaration (and any warning), click the checkbox in the Declaration panel to add a tick to it. Now click the Submit button.
If there are one or more tokens available in the specified account, the VAT return is submitted to HMRC and a Success window is opened indicating this. Click the OK button to close this window. The open obligation now becomes a fulfilled obligation on the Obligation page.
If there are zero tokens in the specified account, a Token Unavailable window is opened explaining this. Click the Buy Token button to open the “Buy Tokens” web page in the default browser, or click the Close button. Whichever button is clicked, the Token Unavailable window is closed.
Buy one or more tokens and click the Submit button in the Submit VAT Return window to begin the final part of the submission process again.
Viewing a VAT Return and Submission Receipt
To view a previously submitted VAT return and its associated submission receipt, select the applicable business, open the Obligations page and click the View link of the applicable fulfilled obligation. Following this, a View VAT Return window (see figure below) is opened.

Fig. View VAT Return window
To close the View VAT Return window, click the Close button.
Note: Submission receipts can also be viewed on the “VAT Submission Receipts” page of the Easy MTD website (requires sign-in):
Note: Only submission receipts submitted using Easy MTD or Easy MTD VAT can be viewed on the Submit VAT Return page and the “VAT Submission Receipts” page on the Easy MTD website.
Printing
To print the content of the View VAT Return window, click the Print button. Following this, the Windows Print window is opened where a printer and printer settings can be specified prior to printing.
If a PDF of a VAT return is required, use the Microsoft Print to PDF printer, or another PDF printer.
Copying to Clipboard
To copy the content of the View VAT Return window to the Windows clipboard, click the Copy button.
once copied to the Windows clipboard, a text version of the content of the View VAT Return window can be pasted into any Windows application.
Viewing Account Information
Account information such as liabilities, payments and penalties held by HMRC for the selected business, can be conveniently viewed in Easy MTD.
Prior to viewing account information, a business must be selected.
Accessing
Account information is accessed on the Account Information page (see figure below) which is opened by clicking the Account Information option on the Value Added Tax menu, or the Account Information link in the Welcome section or the Value Added Tax section.
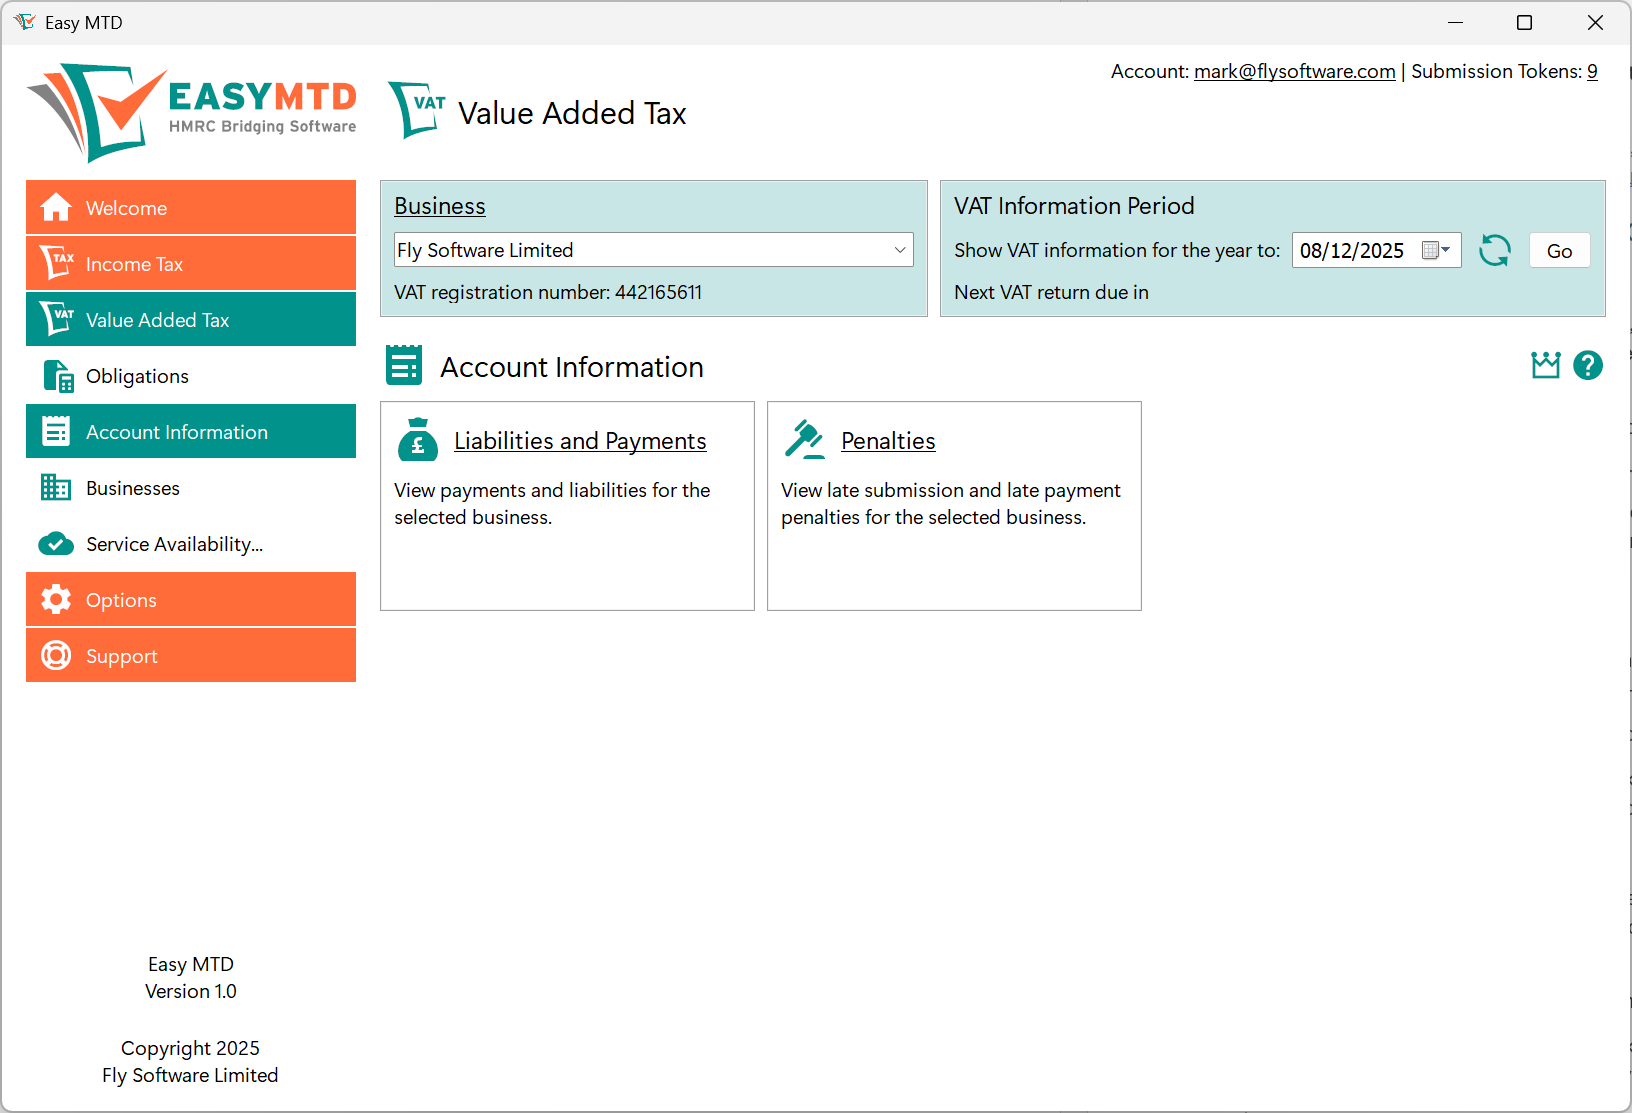
Fig. Account Information page
On the Account Information page, click the Liabilities and Payments link to open the Liabilities and Payments page (see figure below) where liabilities and payments appear.
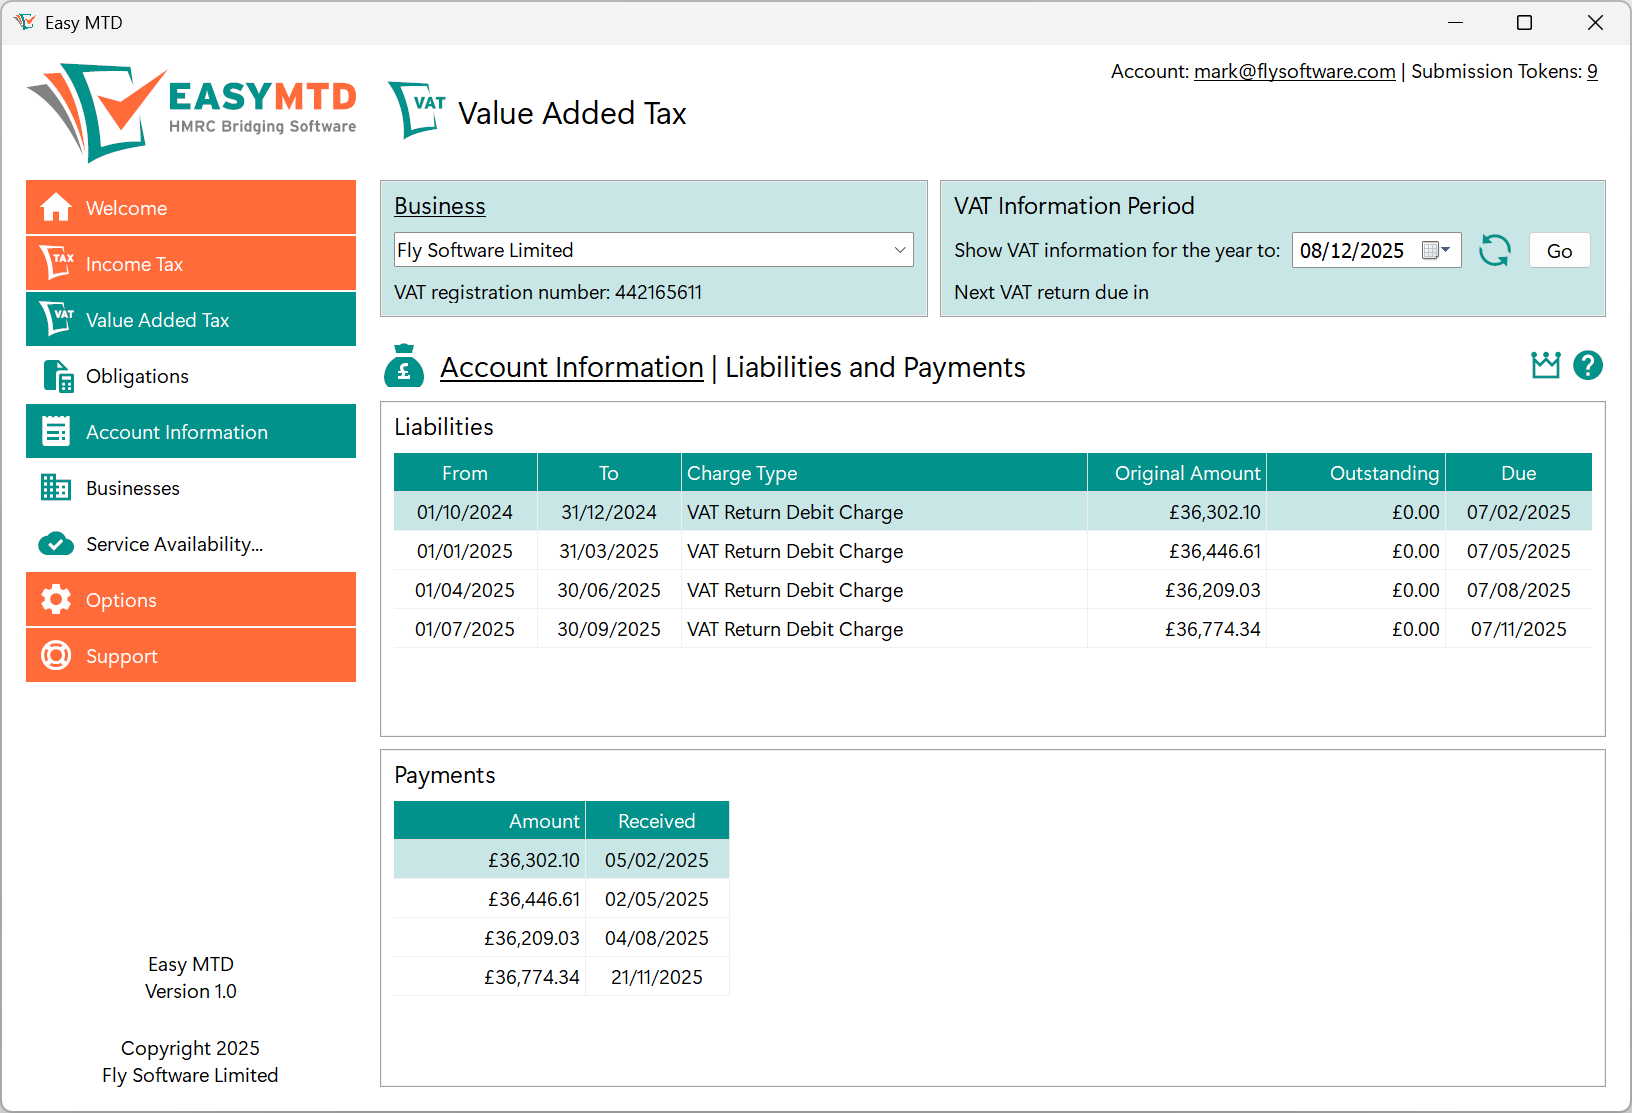
Fig. Liabilities and Payments page
On the Account Information page, click the Penalties link to open the Penalties page (see figure below) where late submission and late payment penalties appear.
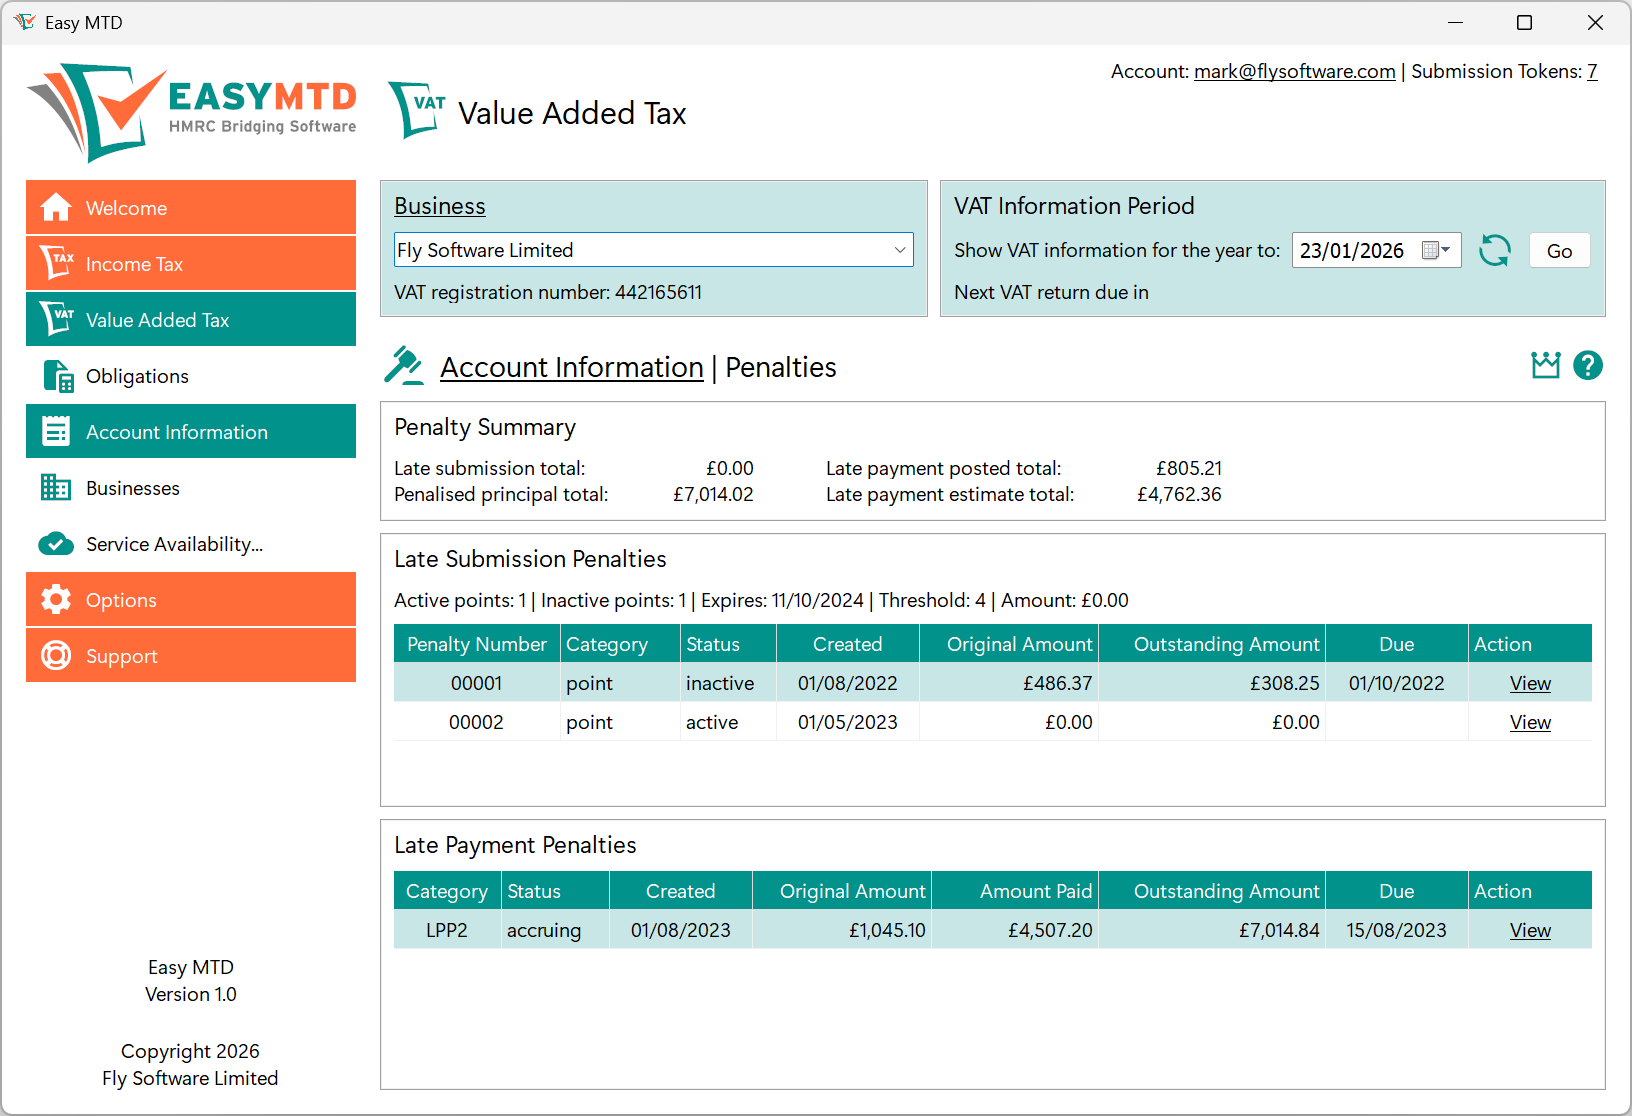
Fig. Penalties page
Checking Service Availability
From time-to-time, HMRC performs maintenance on the Making Tax Digital for VAT service, or sometimes the service has a problem. Both can prevent account information and VAT returns from being viewed, and VAT returns being submitted.
To determine whether maintenance is being performed or if there is an issue, click the Service Availability option on the Value Added Tax menu, or the Service Availability link in the Welcome section, Value Added Tax section or Support section. Following this, the HMRC “VAT online - service availability and issues” web page is opened in the default browser.
Note: Problems with the Making Tax Digital for VAT service are not always reported on the “VAT online - service availability and issues” web page.
Dealing with Figures
The main function of Easy MTD is to submit Income Tax and VAT figures to HMRC. Prior to doing this, certain processes must be performed and adhered to.
The following information appears in this section:
- Retrieving Figures from a Figures File
- Content Format of a Figures File
- Manually Specifying Figures
- Warnings and Errors
Retrieving Figures from a Figures File
Retrieving figures from an Excel (xlsx, xls, xlsm), text (txt) or comma-separated values (csv) file is compulsory when performing the following actions in Easy MTD:
- Submitting a VAT return
- Submitting an Income Tax quarterly update
Associated figures cannot be manually specified when performing these actions because it would break HMRC digital link rules.
Note: Text (txt) and comma separated values (csv) files are unsupported for all figures except those required by the actions listed above.
Note: Only numerical figures need to be retrieved from a figures file. Other data such as dates and alphanumeric text is manually specified.
Selecting a Figures File
An Excel (xlsx, xls, xlsm), text (txt) or comma-separated values (csv) file containing figures that need to be submitted to HMRC, must be selected. Easy MTD windows that allow this contain a Figures File panel (see figure below).

Fig. Figures File panel
To select a figures file, perform the following actions:
- Click the Find button in the Figures File panel to open the Figures File window (see figure below).
- Locate the Excel (xlsx, xls, xlsm), text (txt) or comma-separated values (csv) file where the figures are stored.
- Click the Excel (xlsx, xls, xlsm), text (txt) or comma-separated values (csv) file to select it.
- Click the Open button to close the Figures File window.
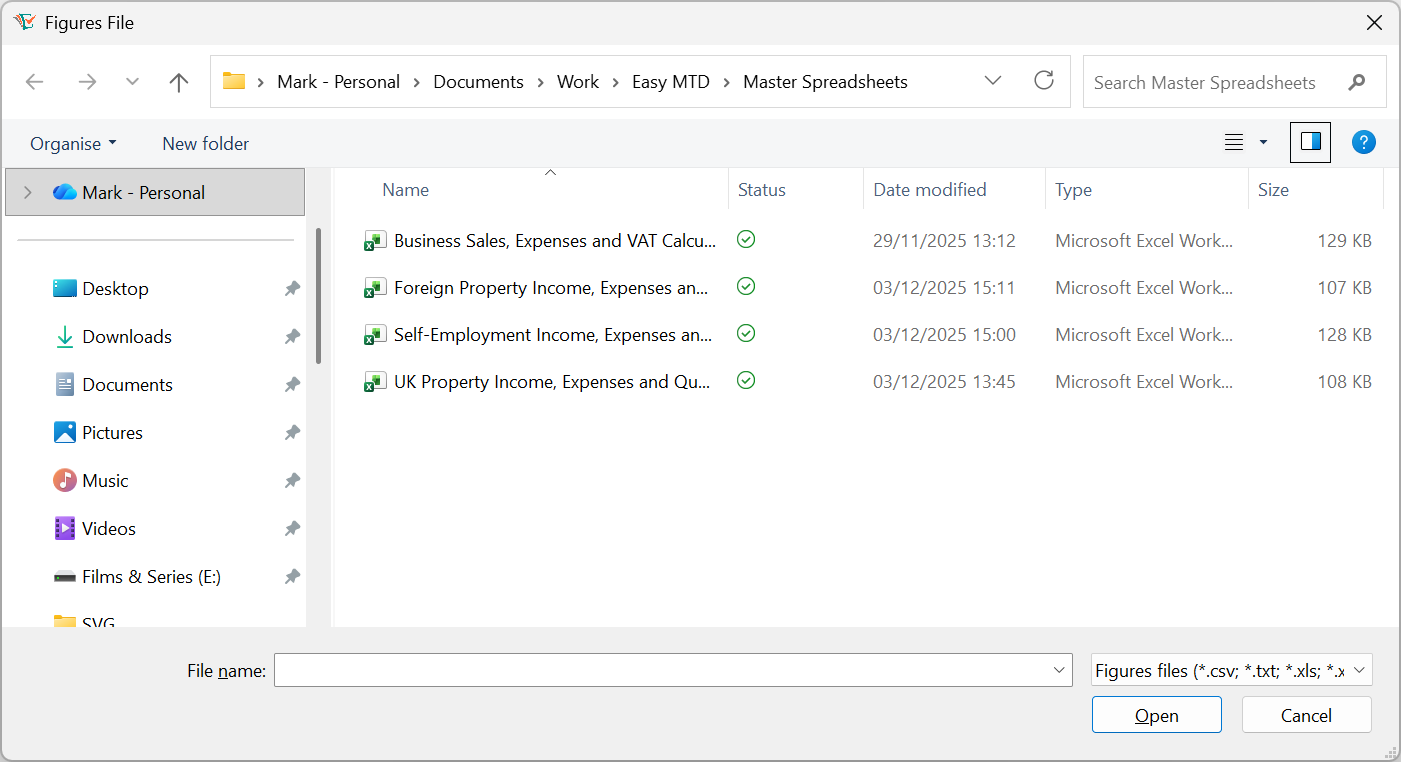
Fig. Figures File window
Alternatively, drag an Excel (xlsx, xls, xlsm), text (txt) or comma-separated values (csv) file from Windows File Explorer to anywhere within the Figures File panel and drop it.
The path and file name of the selected file appear in the Figures File edit box and, if possible, figures contained in the Excel (xlsx, xls, xlsm), text (txt) or comma-separated values (csv) file appear in the window.
Reloading the Figures File
If the content in the Excel (xlsx, xls, xlsm), text (txt) or comma-separated values (csv) file is changed after selection, the figures in the window may become out of date. To display the most up-to-date figures, click the Reload button () in the Figures File panel.
Determining Where Figures in a Spreadsheet are Located
Before figures in a selected Excel (xlsx, xls, xlsm) file appear in the window where they are required, the sheet and cell (see figure below) where each figure is located in the file must be determined.

Fig. Example Excel sheet and cell
The sheet and cell where a figure is located in the selected Excel file can be determined in one of two ways:
Note: Spreadsheet settings are saved for the selected taxpayer or >business so they are already populated the next time the window is opened.
Using the Excel File
The easiest way to determine the sheet and cell where a figure is located in an Excel (xlsx, xls, xlsm) file, is to locate it in the file and indicate what box number or field name it is applicable to. This is achieved by performing the following actions:
- Select a Figures File.
- Click the Select Figures button in the Figures File panel to open the Select Figures window (see figure below) where the content of the Excel file is displayed.
- If necessary, close the Select Figures Instructions window.
- Locate the figure in the Excel file.
- Right-click the figure to display a pop-up menu containing box numbers and/or field names.
- Click the box number or field name the figure is applicable to. Following this, the Sheet Name setting, Cell setting, and the figure for the selected box number or field name are updated in the window where they are required.
- Repeat points 2 to 5 for all necessary figures.
- Click the Close button to close the Select Figures window.

Fig. Select Figures window
Note: The duplicate sheet name functionality that is enabled and disabled using the Duplicate Sheet Names check box, is ignored when using the Excel file to determine the sheet and cell where a figure is located.
Specifying Manually
The sheet and cell where a figure appears in an Excel (xlsx, xls, xlsm) file can be selected and specified manually in the window where the figure is required.
Sheet Name
To select a sheet where a figure is located, click the corresponding Sheet Name edit/list box, locate the required sheet from the list and click it.Example: If the box 1 VAT figure appears in a sheet called Sheet1, select Sheet1 from the box 1 Sheet Name edit/list box.
If all figures appear on the same sheet, click the Duplicate Sheet Names check box to add a tick to it. When a sheet name is now selected for a figure, all other Sheet Name edit/list boxes that are not already selected are populated with the same sheet name.
Cell
To specify a cell where a figure is located, click inside the corresponding Cell edit box and type the name of the cell.
Example: If the box 1 VAT figure appears in a cell called B1, specify B1 in the box 1 Cell edit box.
Content Format of a Figures File
When using an Excel spreadsheet to record figures for Income Tax and VAT, figures can appear anywhere within it because settings are provided to indicate where they are located. When using a text (txt) or comma-separated values (csv) file, the figures within must appear in a particular way.
Text (txt) and Comma-separated Values (csv) Format
Before figures in a selected text (txt) or comma-separated values (csv) file appear in the applicable window, they must be presented in one of two ways in the file:
Note: Text (txt) and comma separated values (csv) files are only supported for the following actions:
- Submitting a VAT return
- Submitting an Income Tax quarterly update
Caution: It is important all figures are specified in the correct order, and blanks used or 0.00 specified for figures that are not applicable. Failure to do so will result in the incorrect figures appearing in the associated Easy MTD window. Double check figures are correct prior to submitting them.
All on the First Line
Figures must be presented on the first line of the text (txt) or comma-separated values (csv) file in the following way:
316995.55, 236102.59, 553098.14, 253485.37, 299612.77, 2950339, 2417408, 212112, 1194723
Caution: Figures in a text (txt) or comma-separated values (csv) file must not use a comma as a thousand separator because a comma must be used to separate each figure. If using a comma for a thousand separator is unavoidable, ensure each figure appears on an individual line.
Omitting Figures
When one or more figures are not applicable or, for VAT returns, need to be calculated, they can be omitted from the text (txt) or comma-separated values (csv) file by leaving a blank space after the preceding comma:
316995.55,236102.59,553098.14,253485.37, ,2950339,2417408, ,
Each on an Individual Line
Each figure must be presented on its own line in the text (txt) or comma-separated values (csv) file in the following way:
316995.55
236102.59
553098.14
253485.37
299612.77
2950339
2417408
212112
1194723
Omitting Figures
When one or more figures are not applicable or, for VAT returns, need to be calculated, they can be omitted from the text (txt) or comma-separated values (csv) file by leaving a blank line:
316995.55
236102.59
553098.14
253485.37
[blank line]
2950339
2417408
[blank line]
[blank line]
Note: [blank line] indicates a blank line. Do NOT specify [blank line] in the text (txt) or comma-separated values (csv) file!
Order of Figures
Figures must appear on the first line (separated by commas) or on separate lines in the following order:
| Action | Order |
|---|---|
| Submit VAT Return |
Box 1 - VAT due in the period on sales and other outputs Box 2 - VAT due in the period on acquisitions of goods made in Northern Ireland from EU member states Box 3 - Total VAT due Box 4 - VAT reclaimed in the period on purchases and other inputs (including acquisitions from the EU) Box 5 - Net VAT to pay to HMRC or reclaim Box 6 - Total value of sales and all other outputs excluding any VAT Box 7 - Total value of purchases and all other inputs excluding any VAT Box 8 - Total value of all supplies of goods and related costs, excluding any VAT, from Northern Ireland to EU member states Box 9 - Total value of all acquisitions of goods and related costs, excluding any VAT, from EU member states to Northern Ireland |
| Submit Self-Employment Quarterly Update |
Box 15 - Turnover Box 16 - Other income Box 82 - Tax taken off trading income Box 17 - Cost of goods Box 18 - Payments to subcontractors Box 19 - Wages and staff costs Box 20 - Car, van and travel expenses Box 21 - Premises running costs Box 22 - Maintenance costs Box 23 - Administration costs Box 24 - Business entertainment costs Box 24 - Advertising costs Box 25 - Interest on bank and other loans Box 26 - Finance charges Box 27 - Irrecoverable debts Box 28 - Professional fees Box 29 - Depreciation Box 30 - Other business expenses Box 32 - Cost of goods (Disallowable) Box 33 - Payments to subcontractors (Disallowable) Box 34 - Wages and staff costs (Disallowable) Box 35 - Car, van and travel expenses (Disallowable) Box 36 - Premises running costs (Disallowable) Box 37 - Maintenance costs (Disallowable) Box 38 - Administration costs (Disallowable) Box 39 - Business entertainment costs (Disallowable) Box 39 - Advertising costs (Disallowable) Box 40 - Interest on bank and other loans (Disallowable) Box 41 - Finance charges (Disallowable) Box 42 - Irrecoverable debts (Disallowable) Box 43 - Professional fees (Disallowable) Box 44 - Depreciation (Disallowable) Box 45 - Other business expenses (Disallowable) |
| Submit UK Property Quarterly Update |
Box 20 - Rent Box 20 - Other income Box 20 - Rent a Room rent Box 21 - Tax deducted Box 22 - Premiums of lease grant Box 23 - Reverse premiums Box 24 - Premises running costs Box 25 - Repairs and maintenance Box 26 - Non-residential financial costs Box 27 - Professional fees Box 28 - Cost of services Box 29 - Travel Costs Box 29 - Other expenses Box 37 - Rent a Room relief claimed Box 44 - Residential financial costs Box 45 - Residential financial costs C/F |
| Submit Foreign Property Quarterly Update |
Box 14 - Rent Box 14 - Other income Box 16 - Premiums of lease grant Box 30C - Foreign tax paid or deducted Box 30D - Special withholding tax or UK tax paid Box 30E - Foreign Tax Credit Relief (FTCR) has been claimed* Box 17 - Premises running costs Box 17 - Repairs and maintenance Box 17 - Non-residential financial costs Box 17 - Professional fees Box 17 - Cost of services Box 17 - Travel costs Box 17 - Other expenses Box 24.1 - Residential financial costs Box 24.2 - Residential financial costs C/F |
*Note:For “Box 30F - Foreign Tax Credit Relief (FTCR) has been claimed”, the value must be Yes or No.
Order of Figures for Consolidated Expenses
When dealing with Income Tax consolidated expenses, figures must appear on the first line (separated by commas) or on separate lines in the following order:
| Action | Order |
|---|---|
| Submit Self-Employment Quarterly Update |
Box 15 - Turnover Box 16 - Other income Box 82 - Tax taken off trading income Box 31 - Consolidated expenses |
| Submit UK Property Quarterly Update |
Box 20 - Rent Box 20 - Other income Box 20 - Rent a Room rent Box 21 - Tax deducted Box 29 - Consolidated expenses Box 37 - Rent a Room relief claimed Box 44 - Residential financial costs Box 45 - Residential financial costs C/F |
| Submit Foreign Property Quarterly Update |
Box 14 - Rent Box 14 - Other income Box 16 - Premiums of lease grant Box 30C - Foreign tax paid or deducted Box 30D - Special withholding tax or UK tax paid Box 30E - Foreign Tax Credit Relief (FTCR) has been claimed^ Box 17 - Consolidated expenses Box 24.1 - Residential financial costs Box 24.2 - Residential financial costs C/F |
Manually Specifying
Under construction!
Warnings and Errors
The box that appears to the left of a field name in windows where figures are required, are coloured in the following ways to help identify warnings and errors associated with the corresponding figure:
| Colour | Title | Description |
|---|---|---|
 |
Valid | The figure is valid. The figures can be submitted if there are no errors for all other figures. |
 |
Warning | The figure has been calculated, rounded or had zero applied. The figures can be submitted if there are no errors for all other figures. |
 |
Error | The figure is in error. The figures cannot be submitted. |
When a box is coloured to indicate a warning or error, the associated figure is the result of the warning (e.g. calculated, rounded or zero) or an error message. Moving the mouse cursor over the figure displays further information about the warning or error and a description of how to resolve it. This information appears at the bottom of the window where the figures are required.
Troubleshooting
Despite every effort having been made to eliminate errors in Easy MTD, some may have slipped through the net and others materialise due to problems with the HMRC system. When this occurs, an error window is normally opened that describes the error.
The following information appears in this section:
Learning More About Errors
Certain error windows have a Find Out More button that can be used to view further information about the topic associated with the error.
Click the Find Out More button to open an associated Easy MTD or HMRC web page in the default browser.
Reporting Errors
Certain error windows have a Report tab that can be used to report the error and automatically open a support ticket. Click the Report tab and click the Send button to send the report to Fly Software and open a support ticket. Following this, an Error Report Sent window is opened. Click the OK button to close this window.
Note: Support tickets can be viewed on the following Easy MTD web page (requires sign-in):